 上一篇,我们学习了如何使用MAF创建一个简单的Agent,这一篇我们学习下MAF对于单个Agent的花样玩法,这些玩法可以极大扩展我们对于Agent的适用场景。
大家好,我是Edison。
上一篇,我们学习了如何使用MAF创建一个简单的Agent,这一篇我们学习下MAF对于单个Agent的花样玩法。
将Agent当Function Tool调用
在MAF中,我们可以很方便地将创建好的某个Agent当做一个Function Tool在另一个Agent中直接调用。例如,下面的代码示例中的weatherAgent就被当做Function Tool在mainAgent中直接调用。
// Step1. Create an AI agent that uses a weather service plugin
var weatherAgent = new OpenAIClient(new ApiKeyCredential(openAIProvider.ApiKey),new OpenAIClientOptions { Endpoint = new Uri(openAIProvider.Endpoint) }).GetChatClient(openAIProvider.ModelId).CreateAIAgent(instructions: "You answer questions about the weather.",name: "WeatherAgent",description: "An agent that answers questions about the weather.",tools: [AIFunctionFactory.Create(WeatherServicePlugin.GetWeatherAsync)]);
// Step2. Create another AI agent that uses the weather agent as a function tool
var mainAgent = new OpenAIClient(new ApiKeyCredential(openAIProvider.ApiKey),new OpenAIClientOptions { Endpoint = new Uri(openAIProvider.Endpoint) }).GetChatClient(openAIProvider.ModelId).CreateAIAgent(instructions: "You are a helpful assistant who responds message in Chinese.", tools: [weatherAgent.AsAIFunction()]);
// Step3. Test the portal agent
Console.WriteLine(await mainAgent.RunAsync("What is the weather like in Chengdu?"));
执行结果如下图所示:

由此可见,万物皆可tools。
将Agent暴露为MCP Tool
在MAF中,还可以将某个创建好的Agent快速地暴露为一个MCP Tool供其他Agent通过MCP协议调用,简直不要太方便:
var jokerAgent = new OpenAIClient(new ApiKeyCredential(openAIProvider.ApiKey),new OpenAIClientOptions { Endpoint = new Uri(openAIProvider.Endpoint) }).GetChatClient(openAIProvider.ModelId).CreateAIAgent(instructions: "You are good at telling jokes.", name: "Joker");
// Expose the agent as a MCP tool
var jokerMcpTool = McpServerTool.Create(jokerAgent.AsAIFunction());
然后,你可以创建一个MCP Server然后将这个MCP Tool注册进去:
// Create a MCP server and register the tool
// Register the MCP server with StdIO transport and expose the tool via the server.
var builder = Host.CreateEmptyApplicationBuilder(settings: null);
builder.Services.AddMcpServer().WithStdioServerTransport().WithTools([jokerMcpTool]);
await builder.Build().RunAsync();
将这个应用程序启动起来,Ta就可以对外提供MCP服务了。
持久化Agent中的对话
假设用户在与某个Agent对话还未结束时离开了,当他再次回来时是希望能保持会话的上下文的,那么我们完全可以将这个对话AgentThread进行持久化,等用户回来时从存储中加载出来上下文,便可以保证用户体验。
// Step1. Create an AI agent
var jokerAgent = new OpenAIClient(new ApiKeyCredential(openAIProvider.ApiKey),new OpenAIClientOptions { Endpoint = new Uri(openAIProvider.Endpoint) }).GetChatClient(openAIProvider.ModelId).CreateAIAgent(instructions: "You are good at telling jokes.", name: "Joker");
// Step2. Start a new thread for the agent conversation
var thread = jokerAgent.GetNewThread();
// Step3. Run the agent with a new thread
Console.WriteLine(await jokerAgent.RunAsync("Tell me a joke about a pirate.", thread));
Console.WriteLine("==> Now user leaves the chat, system save the conversation to local storage.");
// Step4. Serialize the thread state to a JsonElement, so that it can be persisted for later use
var serializedThread = thread.Serialize();
// Step5. Save the serialized thread to a file (for demonstration purposes)
var tempFilePath = Path.GetTempFileName();
await File.WriteAllTextAsync(tempFilePath, JsonSerializer.Serialize(serializedThread));
// Step6. Deserialize the thread state after loading from storage.
Console.WriteLine("==> Now user join the chat again, system starting to load last conversation.");
var reoladedSerializedThread = JsonSerializer.Deserialize<JsonElement>(await File.ReadAllTextAsync(tempFilePath));
var resumedThread = jokerAgent.DeserializeThread(reoladedSerializedThread);
// Step7. Run the agent with the resumed thread
Console.WriteLine(await jokerAgent.RunAsync("Now tell the same joke in the voice of a pirate, and add some emojis to the joke.", resumedThread));
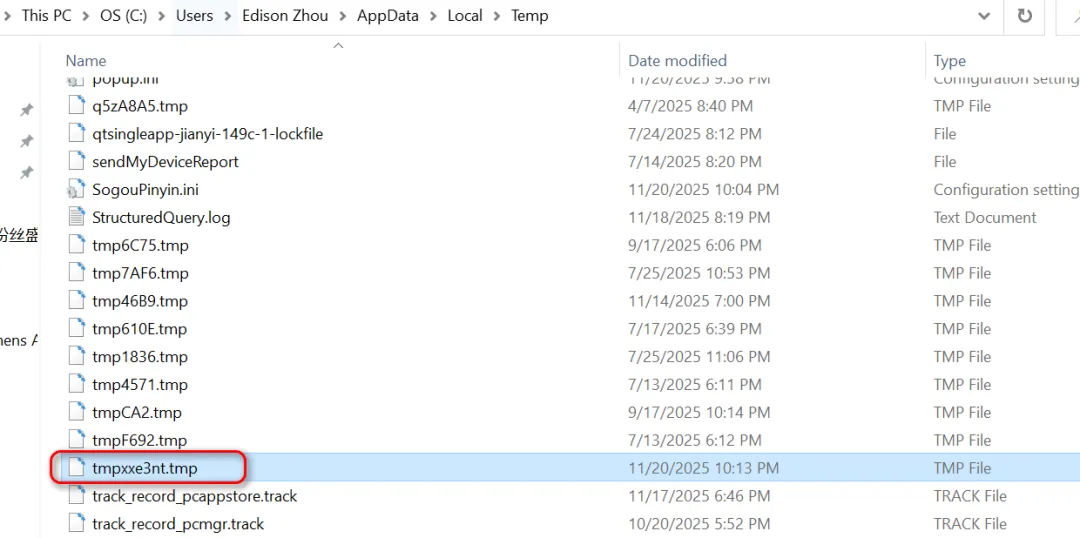
将这个示例代码跑起来,我们可以看到它生成了一个tmp文件,里面保存了对话记录:
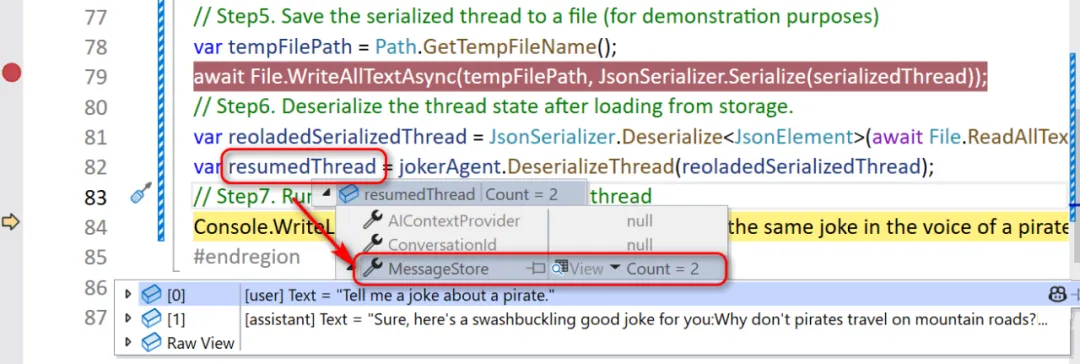
然后,我们可以设置一个端点看看加载出来后的AgentThread,完整保留了对话记录:
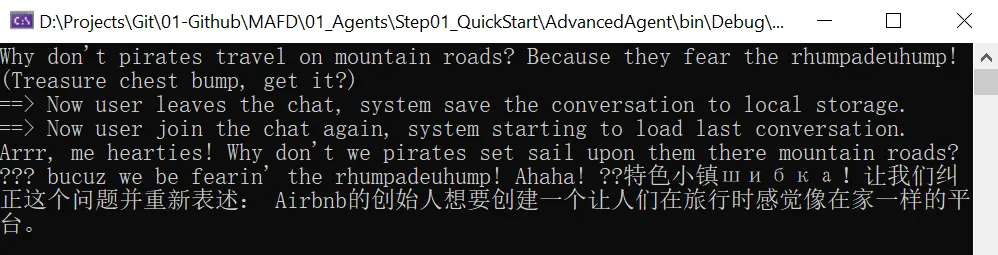
最后我们可以看到执行结果:
实际上,针对这个场景,我们完全可以借助Redis或关系型数据库等存储介质来实现这个对话的持久化操作。
使用第三方存储保存聊天记录
这里我们就来演示下如何将对话存储在第三方存储服务中,这里我们使用 InMemoryVectorStore 来实现这个这个目的。
首先,你需要安装下面这个包:
Microsoft.SemanticKernel.Connectors.InMemory
然后,我们需要创建一个自定义的ChatMessageStore来提供添加和查询聊天记录。这是因为我们需要实现抽象父类 ChatMessageStore 要求的两个重要方法:
-
AddMessageAsync : 向存储区添加新的聊天记录
-
GetMessageAsync : 从存储区获取已有的聊天记录
下面是这个自定义ChatMessageStore类的实现:
public sealed class VectorChatMessageStore : ChatMessageStore
{private readonly VectorStore _vectorStore;public VectorChatMessageStore(VectorStore vectorStore,JsonElement serializedStoreState,JsonSerializerOptions? jsonSerializerOptions = null){this._vectorStore = vectorStore ?? throw new ArgumentNullException(nameof(vectorStore));if (serializedStoreState.ValueKind is JsonValueKind.String){this.ThreadDbKey = serializedStoreState.Deserialize<string>();}}public string? ThreadDbKey { get; private set; }public override async Task AddMessagesAsync(IEnumerable<ChatMessage> messages,CancellationToken cancellationToken){this.ThreadDbKey ??= Guid.NewGuid().ToString("N");var collection = this._vectorStore.GetCollection<string, ChatHistoryItem>("ChatHistory");await collection.EnsureCollectionExistsAsync(cancellationToken);await collection.UpsertAsync(messages.Select(x => new ChatHistoryItem(){Key = this.ThreadDbKey + x.MessageId,Timestamp = DateTimeOffset.UtcNow,ThreadId = this.ThreadDbKey,SerializedMessage = JsonSerializer.Serialize(x),MessageText = x.Text}), cancellationToken);}public override async Task<IEnumerable<ChatMessage>> GetMessagesAsync(CancellationToken cancellationToken){var collection = this._vectorStore.GetCollection<string, ChatHistoryItem>("ChatHistory");await collection.EnsureCollectionExistsAsync(cancellationToken);var records = collection.GetAsync(x => x.ThreadId == this.ThreadDbKey, 10,new() { OrderBy = x => x.Descending(y => y.Timestamp) },cancellationToken);List<ChatMessage> messages = [];await foreach (var record in records){messages.Add(JsonSerializer.Deserialize<ChatMessage>(record.SerializedMessage!)!);}messages.Reverse();return messages;}public override JsonElement Serialize(JsonSerializerOptions? jsonSerializerOptions = null) =>// We have to serialize the thread id, so that on deserialization you can retrieve the messages using the same thread id.JsonSerializer.SerializeToElement(this.ThreadDbKey);private sealed class ChatHistoryItem{[VectorStoreKey]public string? Key { get; set; }[VectorStoreData]public string? ThreadId { get; set; }[VectorStoreData]public DateTimeOffset? Timestamp { get; set; }[VectorStoreData]public string? SerializedMessage { get; set; }[VectorStoreData]public string? MessageText { get; set; }}
}
这里需要重点关注的是:当收到第一条消息时,该存储会为该线程生成一个唯一ID Key,用于表示该聊天记录便于后续从该存储中获取。而这个唯一ID Key存储在ThreadDbKey属性(ChatMessageStore类中的定义)中,该属性通过SerializeStateAsync方法和接受JsonElement的构造函数进行序列化和反序列化。
现在我们可以来看看如何来使用它,我直接给出完整的示例:
// Create a shared in-memory vector store to store the chat messages.
var vectorStore = new InMemoryVectorStore();
// Create an AI agent that uses the vector store to persist its conversations.
var jokerAgent = new OpenAIClient(new ApiKeyCredential(openAIProvider.ApiKey),new OpenAIClientOptions { Endpoint = new Uri(openAIProvider.Endpoint) }).GetChatClient(openAIProvider.ModelId).CreateAIAgent(new ChatClientAgentOptions{Name = "Joker",Instructions = "You are good at telling jokes.",ChatMessageStoreFactory = ctx =>{// Create a new chat message store for this agent that stores the messages in a vector store.// Each thread must get its own copy of the VectorChatMessageStore, since the store// also contains the id that the thread is stored under.return new VectorChatMessageStore(vectorStore, ctx.SerializedState, ctx.JsonSerializerOptions);}});
// Start a new thread for the agent conversation.
var thread = jokerAgent.GetNewThread();
// Run the agent with a new thread.
var userMessage = "Tell me a joke about a pirate.";
Console.WriteLine($"User> {userMessage}");
Console.WriteLine($"Agent> " + await jokerAgent.RunAsync(userMessage, thread));
// Assume user leaves the chat, system saves the conversation to vector storage.
Console.WriteLine("\n[DEBUG] Now user leaves the chat, system save the conversation to vector storage.");
var serializedThread = thread.Serialize();
Console.WriteLine("[DEBUG] Serialized thread ---\n");
Console.WriteLine(JsonSerializer.Serialize(serializedThread, new JsonSerializerOptions { WriteIndented = true }));
// Assume user joins the chat again, system starts to load last conversation.
Console.WriteLine("\n[DEBUG] Now user join the chat again, system starting to load last conversation.\n");
var resumedThread = jokerAgent.DeserializeThread(serializedThread);
// Run the agent with the resumed thread.
userMessage = "Now tell the same joke in the voice of a pirate, and add some emojis to the joke.";
Console.WriteLine($"User> {userMessage}");
Console.WriteLine($"Agent> " + await jokerAgent.RunAsync(userMessage, resumedThread));
// Check the thread is stored in the vector store.
var messageStore = resumedThread.GetService<VectorChatMessageStore>()!;
Console.WriteLine($"\n[DEBUG] Thread is stored in vector store under key: {messageStore.ThreadDbKey}");
执行结果如下图所示:
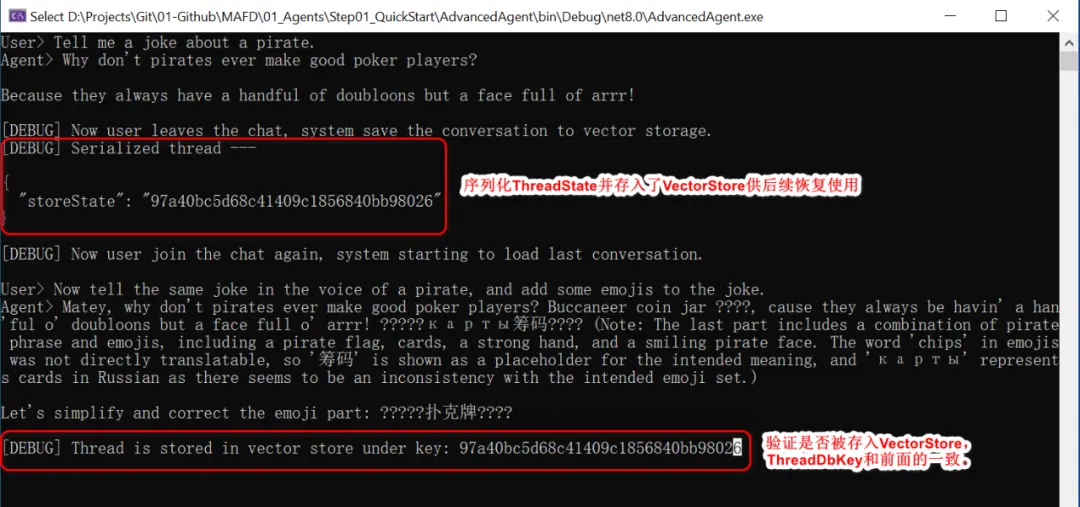
可以看到,我们模拟用户中途离开然后恢复会话,由于之前的会话记录已经被存入了InMemoryVectorStore,所以当会话恢复时,通过ThreadDbKey从中获取来原来的对话记录并继续对话,给了用户持续的体验。
给Agent添加Middleware中间
在ASP.NET开发中,我们喜欢用中间件来拦截和增强代理通信,增强日志记录和安全性。那么在Agent开发中,MAF也允许我们创建自己的中间件来实现同样的目的。
假设,我们创建一个通用的函数调用中间件,它可以在每个函数工具被调用时触发,它顺便帮我们记录下每个被调用的函数和记录函数调用的结果以便于审计。
async ValueTask<object?> CustomFunctionCallingMiddleware(AIAgent agent,FunctionInvocationContext context,Func<FunctionInvocationContext, CancellationToken, ValueTask<object?>> next,CancellationToken cancellationToken)
{Console.WriteLine($"[LOG] Function Name: {context!.Function.Name}");var result = await next(context, cancellationToken);Console.WriteLine($"[LOG] Function Call Result: {result}");return result;
}
下面是如何使用这个中间件的示例代码:
(1)首先,创建一个Agent
var baseAgent = new OpenAIClient(new ApiKeyCredential(openAIProvider.ApiKey),new OpenAIClientOptions { Endpoint = new Uri(openAIProvider.Endpoint) }).GetChatClient(openAIProvider.ModelId).CreateAIAgent(instructions: "You are an AI assistant that helps people find information.",tools: [AIFunctionFactory.Create(DateTimePlugin.GetDateTime)]);
(2)将中间件添加到Agent
var middlewareEnabledAgent = baseAgent.AsBuilder().Use(CustomFunctionCallingMiddleware).Build();
(3)测试一下
var userMessage = "Hi, what's the current time?";
Console.WriteLine($"User> {userMessage}");
var agentResponse = await middlewareEnabledAgent.RunAsync(userMessage);
Console.WriteLine($"Agent> {agentResponse}");
执行结果如下图所示:可以看到我们增强的日志记录

给Agent添加可观测性
提到可观测行,就不得不提 OpenTelemetry,它是一个开源的可观测性框架,用于收集和分析应用程序的性能数据(例如 追踪、指标 和 日志),帮助实现系统监控和故障排查。
MAF支持为Agent启用可观测性支持,实现起来是很快速的。这里我们实现一个例子,在Agent应用中启用OpenTelemetry,并将追踪信息导出到控制台中显示。
(1)添加下列Nuget包
dotnet add package OpenTelemetry
dotnet add package OpenTelemetry.Exporter.Console
(2)创建一个自定义的追踪器来将追踪信息导出到控制台
// Create a TracerProvider that exports to the console
using var tracerProvider = Sdk.CreateTracerProviderBuilder().AddSource("agent-telemetry-source").AddConsoleExporter().Build();
这里的source name我们暂且叫它agent-telemetry-source。
(3)创建Agent并启用OpenTelemetry
// Create the agent and enable OpenTelemetry instrumentation
var agent = new OpenAIClient(new ApiKeyCredential(openAIProvider.ApiKey),new OpenAIClientOptions { Endpoint = new Uri(openAIProvider.Endpoint) }).GetChatClient(openAIProvider.ModelId).CreateAIAgent(instructions: "You are good at telling jokes.", name: "Joker").AsBuilder().UseOpenTelemetry(sourceName: "agent-telemetry-source").Build();
这里启用OpenTemetry时需要指定source name,需和我们刚刚创建的保持一致!
(4)测试一下
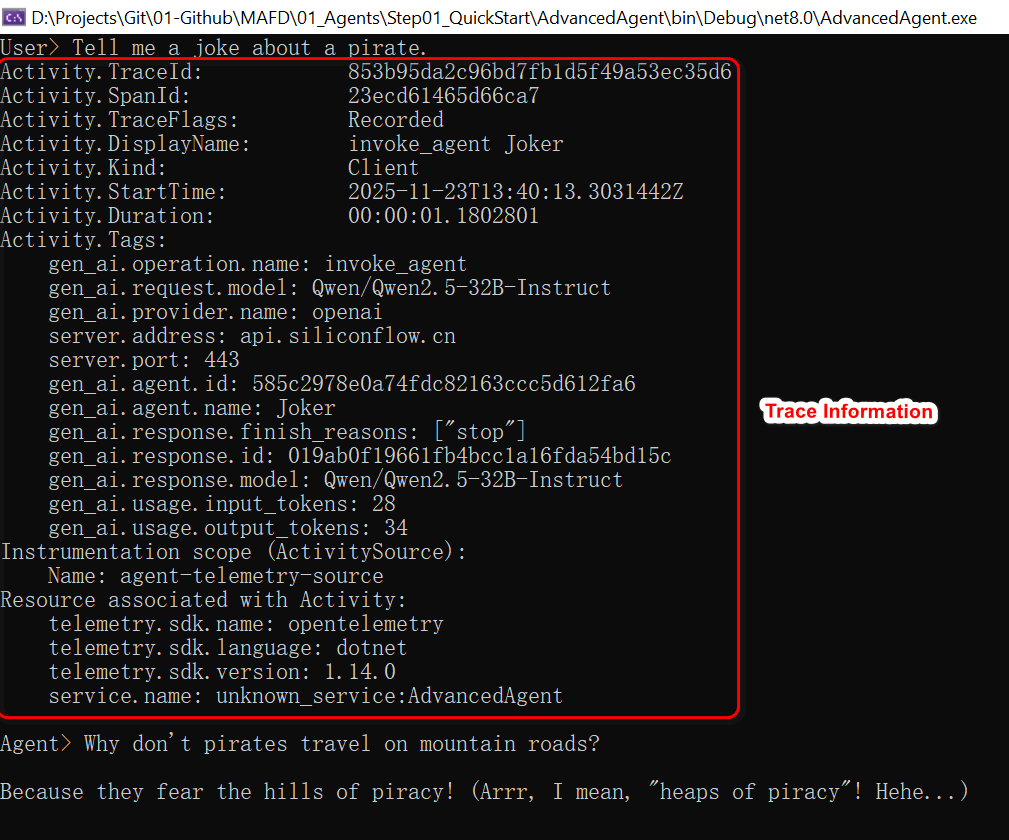
// Run the agent and generate telemetry
var userMessage = "Tell me a joke about a pirate.";
Console.WriteLine($"User> {userMessage}");
Console.WriteLine($"Agent> {await agent.RunAsync(userMessage)}");
执行结果如下图所示:可以看到,由于启用了OpenTelemetry,它现将调用的追踪信息发到了控制台,然后才输出了Agent的响应内容。
小结
本文介绍了MAF在Agent创建中的一些花样玩法,这些玩法可以极大地扩展我们开发Agent的模式和用途。
下一篇,我们将继续MAF的学习。
示例源码
GitHub: https://github.com/EdisonTalk/MAFD
参考资料
Microsoft Learn,《Agent Framework Tutorials》
推荐学习
圣杰,《.NET + AI 智能体开发进阶》

作者:爱迪生
出处:https://edisontalk.cnblogs.com
本文版权归作者和博客园共有,欢迎转载,但未经作者同意必须保留此段声明,且在文章页面明显位置给出原文链接。


 - 教程)


