假设我们有三台机器,172.24.52.209,172.24.52.210,172.24.52.211。
用户名xjw
三台机器都创建文件夹/home/xjw/docker/learning/elasticsearch,和/home/xjw/docker/learning/kibana,learning为项目名
mkdir -p /home/xjw/docker/learning/elasticsearch
mkdir -p /home/xjw/docker/learning/kibana
三台机器都下载elasticsearch和对应的kibana,我选择的是最新的9.2.1
docker pull elasticsearch:9.2.1
docker pull kibana:9.2.1
进入目录/home/xjw/docker/learning/elasticsearch
在当前目录创建文件docker-compose-setup.yml,内容如下
version: "2.2"services:setup:image: elasticsearch:9.2.1volumes:- ./certs:/usr/share/elasticsearch/config/certsuser: "0"command: >bash -c 'if [ x${ELASTIC_PASSWORD} == x ]; thenecho "Set the ELASTIC_PASSWORD environment variable in the .env file";exit 1;elif [ x${KIBANA_PASSWORD} == x ]; thenecho "Set the KIBANA_PASSWORD environment variable in the .env file";exit 1;fi;if [ ! -f config/certs/ca.zip ]; thenecho "Creating CA";bin/elasticsearch-certutil ca --silent --pem -out config/certs/ca.zip;unzip config/certs/ca.zip -d config/certs;fi;if [ ! -f config/certs/certs.zip ]; thenecho "Creating certs";bin/elasticsearch-certutil cert --silent --pem -out config/certs/certs.zip --in config/certs/instances.yml --ca-cert config/certs/ca/ca.crt --ca-key config/certs/ca/ca.key;unzip config/certs/certs.zip -d config/certs;fi;echo "Setting file permissions"chown -R root:root config/certs;find . -type d -exec chmod 750 \{\} \;;find . -type f -exec chmod 640 \{\} \;;echo "All done!";'其中image: elasticsearch:9.2.1,如果你用其他版本就修改这里,注意es和kibana版本要处处对应
version: "2.2"可能会报警告,不管它
volumes:- ./certs:/usr/share/elasticsearch/config/certs
这里是做了文件夹映射
在当前目录创建文件.env,内容如下
# Password for the 'elastic' user (at least 6 characters)
ELASTIC_PASSWORD=espasswd# Password for the 'kibana_system' user (at least 6 characters)
KIBANA_PASSWORD=kbpasswd# Version of Elastic products
STACK_VERSION=9.2.1# Set the cluster name
CLUSTER_NAME=es-cluster# Set to 'basic' or 'trial' to automatically start the 30-day trial
LICENSE=basic
#LICENSE=trial# Port to expose Elasticsearch HTTP API to the host
ES_PORT=9200
#ES_PORT=127.0.0.1:9200# Port to expose Elasticsearch Transport to the host
ES_TRANSPORT_PORT=9300# Port to expose Kibana to the host
KIBANA_PORT=5601
#KIBANA_PORT=80# Increase or decrease based on the available host memory (in bytes)
MEM_LIMIT=17179869184# Project namespace (defaults to the current folder name if not set)
#COMPOSE_PROJECT_NAME=myproject
root用户在当前创建证书目录
mkdir ./certs
chmod g+rwx ./certs
chgrp 0 ./certs
root用户在当前目录的certs目录下vim instances.yml,并写入如下内容
instances:- name: es01dns:- es01- localhostip:- 172.24.52.209- 127.0.0.1- name: es02dns:- es02- localhostip:- 172.24.52.210- 127.0.0.1- name: es03dns:- es03- localhostip:- 172.24.52.211- 127.0.0.1然后执行
docker compose -f docker-compose-setup.yml up
然后在certs文件夹生成了目录,目录结构如下所示,
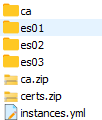
将目录同步到所有节点
将certs目录下载下来,上传到其他节点上,记得
chown 0 -R  certs
chgrp 0 -R certs
第一个节点当前目录创建docekr-compose.yml文件,写入如下,其他两个节点修改environment下的node.name分别为es02,es03,修改network.publish_host分别为es02,es03。
x-extra_hosts:&es_extra_hosts- "es01:172.24.52.209"- "es02:172.24.52.210"- "es03:172.24.52.211"services:elasticsearch:image: elasticsearch:9.2.1volumes:- ./certs:/usr/share/elasticsearch/config/certs- /home/xjw/docker/learning/elasticsearch/data:/usr/share/elasticsearch/dataports:- ${ES_PORT}:9200- ${ES_TRANSPORT_PORT}:9300extra_hosts: *es_extra_hostsenvironment:- node.name=es01- cluster.name=${CLUSTER_NAME}- cluster.initial_master_nodes=es01,es02,es03- discovery.seed_hosts=es01,es02,es03- network.publish_host=es01- ELASTIC_PASSWORD=${ELASTIC_PASSWORD}- bootstrap.memory_lock=true- xpack.security.enabled=true- xpack.security.http.ssl.enabled=true- xpack.security.http.ssl.key=certs/es01/es01.key- xpack.security.http.ssl.certificate=certs/es01/es01.crt- xpack.security.http.ssl.certificate_authorities=certs/ca/ca.crt- xpack.security.transport.ssl.enabled=true- xpack.security.transport.ssl.key=certs/es01/es01.key- xpack.security.transport.ssl.certificate=certs/es01/es01.crt- xpack.security.transport.ssl.certificate_authorities=certs/ca/ca.crt- xpack.security.transport.ssl.verification_mode=certificate- xpack.license.self_generated.type=${LICENSE}mem_limit: ${MEM_LIMIT}ulimits:memlock:soft: -1hard: -1healthcheck:test:["CMD-SHELL","curl -s --cacert config/certs/ca/ca.crt https://localhost:9200 | grep -q 'missing authentication credentials'",]interval: 10stimeout: 10sretries: 120kibana:image: docker.elastic.co/kibana/kibana:${STACK_VERSION}volumes:- ./certs:/usr/share/kibana/config/certs- /home/xjw/docker/learning/kibana/data:/usr/share/kibana/dataports:- ${KIBANA_PORT}:5601extra_hosts: *es_extra_hostsenvironment:- SERVERNAME=kibana- ELASTICSEARCH_HOSTS=https://es01:9200- ELASTICSEARCH_USERNAME=kibana_system- ELASTICSEARCH_PASSWORD=${KIBANA_PASSWORD}- ELASTICSEARCH_SSL_CERTIFICATEAUTHORITIES=config/certs/ca/ca.crtmem_limit: ${MEM_LIMIT}healthcheck:test:["CMD-SHELL","curl -s -I http://localhost:5601 | grep -q 'HTTP/1.1 302 Found'",]interval: 10stimeout: 10sretries: 120三台机器都执行
chmod g+rwx /home/xjw/docker/learning/kibana/data/
chmod g+rwx /home/xjw/docker/learning/elasticsearch/data/
修改权限
sudo chown -R 1000:1000 /home/xjw/docker/learning/elasticsearch/
设置主机系统级参数 vm.max_map_count
echo "vm.max_map_count=262144" | sudo tee -a /etc/sysctl.d/99-es.conf
sudo sysctl -p /etc/sysctl.d/99-es.conf
三个机器都启动es
docker compose up elasticsearch -d
启动后可以查看集群状态
curl --cacert ./certs/ca/ca.crt -u elastic:$ELASTIC_PASSWORD https://localhost:9200/_cat/nodes?v
# 或者 Docker Compose 内部执行
docker compose exec -it elasticsearch curl --cacert /usr/share/elasticsearch/config/certs/ca/ca.crt -u elastic:$ELASTIC_PASSWORD https://localhost:9200/_cat/health?v
成功启动后会显示

其中master下面的*代表这个是主节点,下面我们的kibana要在主节点上启动
在es中设置kibana的密码,设置成和.env文件上写的一样
docker compose exec -it elasticsearch bin/elasticsearch-reset-password -i -u kibana_system
在主节点上启动kibana
docker compose up kibana -d
可以通过启动kibana的机器ip的5601端口访问es,用户名为默认的elastic,密码为.env文件中的espasswd
)
![[251122 678mAh] 模拟赛没破防有感 3.0](http://pic.xiahunao.cn/[251122 678mAh] 模拟赛没破防有感 3.0)


)

