背景:
项目需要,适配opengauss
环境准备
基础环境准备
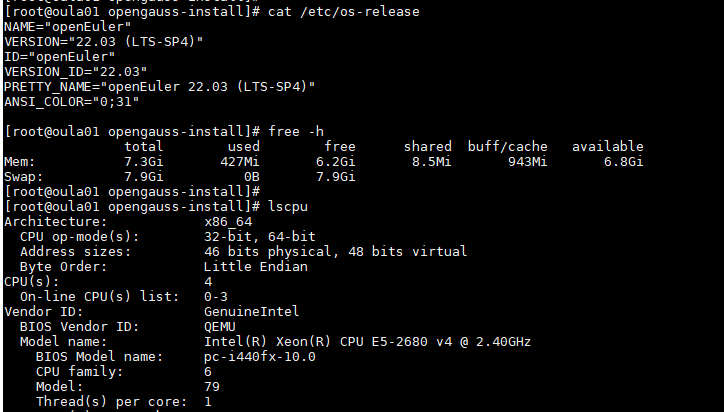
准备一台4核8G的openEuler 22.03 (LTS-SP4)系统服务器
1.关闭selinux
setenforce 0
sed -i 's/SELINUX=enforcing/SELINUX=disabled/g' /etc/selinux/config
2.关闭防火墙
systemctl disable firewalld.service
systemctl stop firewalld.service
3.设置字符集参数
#系统显示值包含"en_US",则导航栏为英文,如果系统显示值包含"zh_CN",则为中文语言,任君挑选
export LANG=zh_CN.UTF-8
#export LANG=en_US.UTF-8
4.确认服务器时区
[root@oula01 opengauss-install]# timedatectlLocal time: Wed 2025-11-19 13:17:36 CSTUniversal time: Wed 2025-11-19 05:17:36 UTCRTC time: Wed 2025-11-19 05:17:36Time zone: Asia/Shanghai (CST, +0800)
System clock synchronized: yesNTP service: activeRTC in local TZ: no
5.关闭swap交换分区
swapoff -a
6.设置网卡MTU值
ifconfig 网卡编号 mtu 值
[root@oula01 conf]# ifconfig
ens18: flags=4163<UP,BROADCAST,RUNNING,MULTICAST>  mtu 1500inet 192.168.35.11  netmask 255.255.255.0  broadcast 192.168.35.255inet6 fe80::be24:11ff:fe7b:8ef7  prefixlen 64  scopeid 0x20<link>ether bc:24:11:7b:8e:f7  txqueuelen 1000  (Ethernet)RX packets 133835  bytes 377651503 (360.1 MiB)RX errors 0  dropped 6612  overruns 0  frame 0TX packets 79007  bytes 5288193 (5.0 MiB)TX errors 0  dropped 0 overruns 0  carrier 0  collisions 0lo: flags=73<UP,LOOPBACK,RUNNING>  mtu 65536inet 127.0.0.1  netmask 255.0.0.0inet6 ::1  prefixlen 128  scopeid 0x10<host>loop  txqueuelen 1000  (Local Loopback)RX packets 30  bytes 2160 (2.1 KiB)RX errors 0  dropped 0  overruns 0  frame 0TX packets 30  bytes 2160 (2.1 KiB)TX errors 0  dropped 0 overruns 0  carrier 0  collisions 0[root@oula01 conf]#
[root@oula01 conf]# ifconfig ens18 mtu 8192
[root@oula01 conf]# ifconfig
ens18: flags=4163<UP,BROADCAST,RUNNING,MULTICAST>  mtu 8192inet 192.168.35.11  netmask 255.255.255.0  broadcast 192.168.35.255inet6 fe80::be24:11ff:fe7b:8ef7  prefixlen 64  scopeid 0x20<link>ether bc:24:11:7b:8e:f7  txqueuelen 1000  (Ethernet)RX packets 133993  bytes 377663192 (360.1 MiB)RX errors 0  dropped 6625  overruns 0  frame 0TX packets 79045  bytes 5292417 (5.0 MiB)TX errors 0  dropped 0 overruns 0  carrier 0  collisions 0lo: flags=73<UP,LOOPBACK,RUNNING>  mtu 65536inet 127.0.0.1  netmask 255.0.0.0inet6 ::1  prefixlen 128  scopeid 0x10<host>loop  txqueuelen 1000  (Local Loopback)RX packets 30  bytes 2160 (2.1 KiB)RX errors 0  dropped 0  overruns 0  frame 0TX packets 30  bytes 2160 (2.1 KiB)TX errors 0  dropped 0 overruns 0  carrier 0  collisions 0
7.关闭RemoveIPC
vim  /etc/systemd/logind.conf
RemoveIPC=no
有的在/usr/lib/systemd/system/systemd-logind.service里面修改,修改后要重载生效
systemctl daemon-reload
systemctl restart systemd-logind
#检查
[root@oula01 conf]# loginctl show-session | grep RemoveIPC
RemoveIPC=no
[root@oula01 conf]#
[root@oula01 conf]# systemctl show systemd-logind | grep RemoveIPC
RemoveIPC=no
8.设置root用户远程登录并去掉banner
vim /etc/ssh/sshd_config
PermitRootLogin yes
#Banner XXXX
systemctl restart sshd.service
#去掉连接到系统时,系统提示的欢迎信息。欢迎信息会干扰安装时远程操作的返回结果,影响安装正常执行
9.了解两个用户及组名
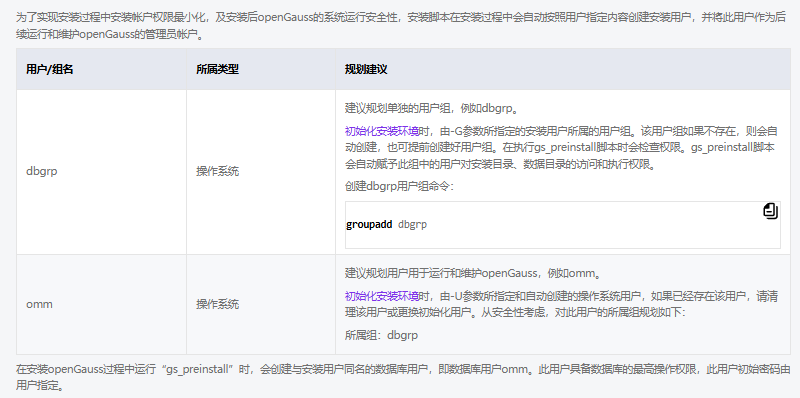
groupadd dbgrp
参考:
https://docs.opengauss.org/zh/docs/6.0.0/docs/InstallationGuide/准备软硬件安装环境_企业版.html
预安装+安装【gs_preinstall】【gs_install】
1.执行预安装的用户如果是普通用户,要先加大最大文件描述符的数量
/etc/security/limits.d/*.conf
xx soft nofile 1000000
xx hard nofile 1000000
xx为普通用户,或者直接用*
[root@oula01 conf]# ulimit -n
1000000
2.解压安装包(我规划软件包路径为/apps/opengauss-install)
tar -zxf openGauss-All-6.0.2-openEuler22.03-x86_64.tar.gz -C /apps/opengauss-install
cd /apps/opengauss-install
tar -zxf openGauss-OM-6.0.2-openEuler22.03-x86_64.tar.gz
#可以看到两个目录script和lib
chmod 755 -R /apps/opengauss-install/

3.检查hostname与/etc/hostname是否一致
[root@oula01 script]# echo "192.168.35.11 oula01" >> /etc/hosts
[root@oula01 script]# hostname -i
192.168.35.11
4.配置xml,这边以我测试环境为例
vim /apps/opengauss-install/single.xml
<?xml version="1.0" encoding="UTF-8"?>
<ROOT><!-- openGauss整体信息 --><CLUSTER><!-- 数据库名称 --><PARAM name="clusterName" value="dbCluster" /><!-- 数据库节点名称(hostname) --><PARAM name="nodeNames" value="oula01" /><!-- 数据库安装目录--><PARAM name="gaussdbAppPath" value="/apps/huawei/install/app" /><!-- 日志目录--><PARAM name="gaussdbLogPath" value="/apps/log/omm" /><!-- 临时文件目录--><PARAM name="tmpMppdbPath" value="/apps/huawei/tmp" /><!-- 数据库工具目录--><PARAM name="gaussdbToolPath" value="/apps/huawei/install/om" /><!-- 数据库core文件目录--><PARAM name="corePath" value="/apps/huawei/corefile" /><!-- 节点IP,与数据库节点名称列表一一对应 --><!-- 如果用ipv6 替换ipv4地址即可 如:<PARAM name="backIp1s" value="2407:xxxx:xxxx:xxxx:xxxx:xxxx:caa:2335"/> --><PARAM name="backIp1s" value="192.168.35.11"/></CLUSTER><!-- 每台服务器上的节点部署信息 --><DEVICELIST><!-- 节点1上的部署信息 --><DEVICE sn="oula01"><!-- 节点1的主机名称 --><PARAM name="name" value="oula01"/><!-- 节点1所在的AZ及AZ优先级 --><PARAM name="azName" value="AZ1"/><PARAM name="azPriority" value="1"/><!-- 节点1的IP,如果服务器只有一个网卡可用,将backIP1和sshIP1配置成同一个IP --><!-- 用ipv6安装部署时 换上ipv6地址即可,后面xml文件示例也是同样操作 --><PARAM name="backIp1" value="192.168.35.11"/><PARAM name="sshIp1" value="192.168.35.11"/><!--dbnode--><PARAM name="dataNum" value="1"/><PARAM name="dataPortBase" value="15400"/><PARAM name="dataNode1" value="/apps/huawei/install/data/dn"/><PARAM name="dataNode1_syncNum" value="0"/></DEVICE></DEVICELIST>
</ROOT>
5.执行gs_preinstall
[root@oula01 script]# ./gs_preinstall -U omm -G dbgrp -X /apps/opengauss-install/single.xml
Parsing the configuration file.
Successfully parsed the configuration file.
Installing the tools on the local node.
Successfully installed the tools on the local node.
Setting host ip env
Successfully set host ip env.
Are you sure you want to create the user[omm] (yes/no)? yes
Please enter password for cluster user.
Password:
Please enter password for cluster user again.
Password:
Generate cluster user password files successfully.
Successfully created [omm] user on all nodes.
Preparing SSH service.
Successfully prepared SSH service.
Checking OS software.
Successfully check OS software.
Checking OS version.
Successfully checked OS version.
Checking cpu instructions.
Successfully checked cpu instructions.
Creating cluster's path.
Successfully created cluster's path.
Set and check OS parameter.
Setting OS parameters.
Successfully set OS parameters.
Warning: Installation environment contains some warning messages.
Please get more details by "/apps/opengauss-install/script/gs_checkos -i A -h oula01 -X /apps/opengauss-install/single.xml --detail".
Set and check OS parameter completed.
Preparing CRON service.
Successfully prepared CRON service.
Setting user environmental variables.
Successfully set user environmental variables.
Setting the dynamic link library.
Successfully set the dynamic link library.
Setting Core file
Successfully set core path.
Setting pssh path
Successfully set pssh path.
Setting Cgroup.
Successfully set Cgroup.
Set ARM Optimization.
No need to set ARM Optimization.
Fixing server package owner.
Setting finish flag.
Successfully set finish flag.
Preinstallation succeeded.
[root@oula01 script]# /apps/opengauss-install/script/gs_checkos -i A -h oula01 -X /apps/opengauss-install/single.xml --detail
Checking items:A1. [ OS version status ]                                   : Normal[oula01]openEuler_22.03_64bitA2. [ Kernel version status ]                               : NormalThe names about all kernel versions are same. The value is "5.10.0-216.0.0.115.oe2203sp4.x86_64".A3. [ Unicode status ]                                      : NormalThe values of all unicode are same. The value is "LANG=en_US.UTF-8".A4. [ Time zone status ]                                    : NormalThe informations about all timezones are same. The value is "+0800".A5. [ Swap memory status ]                                  : NormalThe value about swap memory is correct.A6. [ System control parameters status ]                    : Warning[oula01]Warning reason: variable 'net.ipv4.ip_local_port_range' RealValue '1024 65000' ExpectedValue '26000 65535'.Warning reason: variable 'net.ipv4.tcp_fin_timeout' RealValue '2' ExpectedValue '60'.Warning reason: variable 'net.ipv4.tcp_retries1' RealValue '3' ExpectedValue '5'.Warning reason: variable 'net.ipv4.tcp_syn_retries' RealValue '2' ExpectedValue '5'.Warning reason: variable 'net.ipv4.tcp_synack_retries' RealValue '2' ExpectedValue '5'.Check_SysCtl_Parameter warning.A7. [ File system configuration status ]                    : Warning[oula01]Warning reason: variable 'max user processes' RealValue '102400' ExpectedValue 'unlimited'A8. [ Disk configuration status ]                           : NormalThe value about XFS mount parameters is correct.A9. [ Pre-read block size status ]                          : NormalThe value about Logical block size is correct.A10.[ IO scheduler status ]                                 : NormalThe value of IO scheduler is correct.A11.[ Network card configuration status ]                   : Warning[oula01]
BondMode NullWarning reason: Failed to obtain the network card speed value. Maybe the network card "ens18" is not working.A12.[ Time consistency status ]                             : NormalThe ntpd or chronyd service is started, local time is "2025-11-19 15:06:32".A13.[ Firewall service status ]                             : Warning[oula01]
The firewall service status RealVaue 'enabled' ExpectedValue 'disabled'A14.[ THP service status ]                                  : NormalThe THP service is stopped.
Total numbers:14. Abnormal numbers:0. Warning numbers:4.
6.能调整尽量调整到不警告。
[root@oula01 opengauss-install]# /apps/opengauss-install/script/gs_checkos -i A -h oula01 -X /apps/opengauss-install/single.xml --detail
Checking items:A1. [ OS version status ]                                   : Normal[oula01]openEuler_22.03_64bitA2. [ Kernel version status ]                               : NormalThe names about all kernel versions are same. The value is "5.10.0-216.0.0.115.oe2203sp4.x86_64".A3. [ Unicode status ]                                      : NormalThe values of all unicode are same. The value is "LANG=en_US.UTF-8".A4. [ Time zone status ]                                    : NormalThe informations about all timezones are same. The value is "+0800".A5. [ Swap memory status ]                                  : NormalThe value about swap memory is correct.A6. [ System control parameters status ]                    : NormalAll values about system control  parameters are correct.A7. [ File system configuration status ]                    : NormalBoth soft nofile and hard nofile are correct.A8. [ Disk configuration status ]                           : NormalThe value about XFS mount parameters is correct.A9. [ Pre-read block size status ]                          : NormalThe value about Logical block size is correct.A10.[ IO scheduler status ]                                 : NormalThe value of IO scheduler is correct.A11.[ Network card configuration status ]                   : Warning[oula01]
BondMode NullWarning reason: Failed to obtain the network card speed value. Maybe the network card "ens18" is not working.A12.[ Time consistency status ]                             : NormalThe ntpd or chronyd service is started, local time is "2025-11-19 15:18:42".A13.[ Firewall service status ]                             : NormalThe firewall service is stopped.A14.[ THP service status ]                                  : NormalThe THP service is stopped.
Total numbers:14. Abnormal numbers:0. Warning numbers:1.
7.执行安装gs_install
su - omm
cd /apps/opengauss-install/script
[omm@oula01 script]$ ./gs_install -X /apps/opengauss-install/single.xml --gsinit-parameter="--locale=en_US.utf8"
Parsing the configuration file.
Successfully checked gs_uninstall on every node.
Check preinstall on every node.
Successfully checked preinstall on every node.
Creating the backup directory.
Successfully created the backup directory.
begin deploy..
Installing the cluster.
begin prepare Install Cluster..
Checking the installation environment on all nodes.
begin install Cluster..
Installing applications on all nodes.
Successfully installed APP.
begin init Instance..
encrypt cipher and rand files for database.
Please enter password for database:
Please repeat for database:
begin to create CA cert files
The sslcert will be generated in /apps/huawei/install/app/share/sslcert/om
NO cm_server instance, no need to create CA for CM.
Non-dss_ssl_enable, no need to create CA for DSS
Cluster installation is completed.
Configuring.
Deleting instances from all nodes.
Successfully deleted instances from all nodes.
Checking node configuration on all nodes.
Initializing instances on all nodes.
Updating instance configuration on all nodes.
Check consistence of memCheck and coresCheck on database nodes.
Configuring pg_hba on all nodes.
Configuration is completed.
The cluster status is Normal.
Successfully started cluster.
Successfully installed application.
end deploy..
#如果忘记添加字符集参数,可以删了再安装
[omm@oula01 script]$ ./gs_uninstall --delete-data
Checking uninstallation.
Successfully checked uninstallation.
Stopping the cluster.
Successfully stopped the cluster.
Successfully deleted instances.
Uninstalling application.
Successfully uninstalled application.
No need to clear dss disk.
Successfully deleted log.
Uninstallation succeeded.#中间会让你设置密码。
设置的密码要符合复杂度要求:
最少包含8个字符,最多包含16个字符。
不能和用户名、当前密码(ALTER)、或当前密码反序相同。
至少包含大写字母(A-Z)、小写字母(a-z)、数字、非字母数字字符(限定为~!@#$%^&*()-_=+\|[{}];:,<.>/?)四类字符中的三类字符。
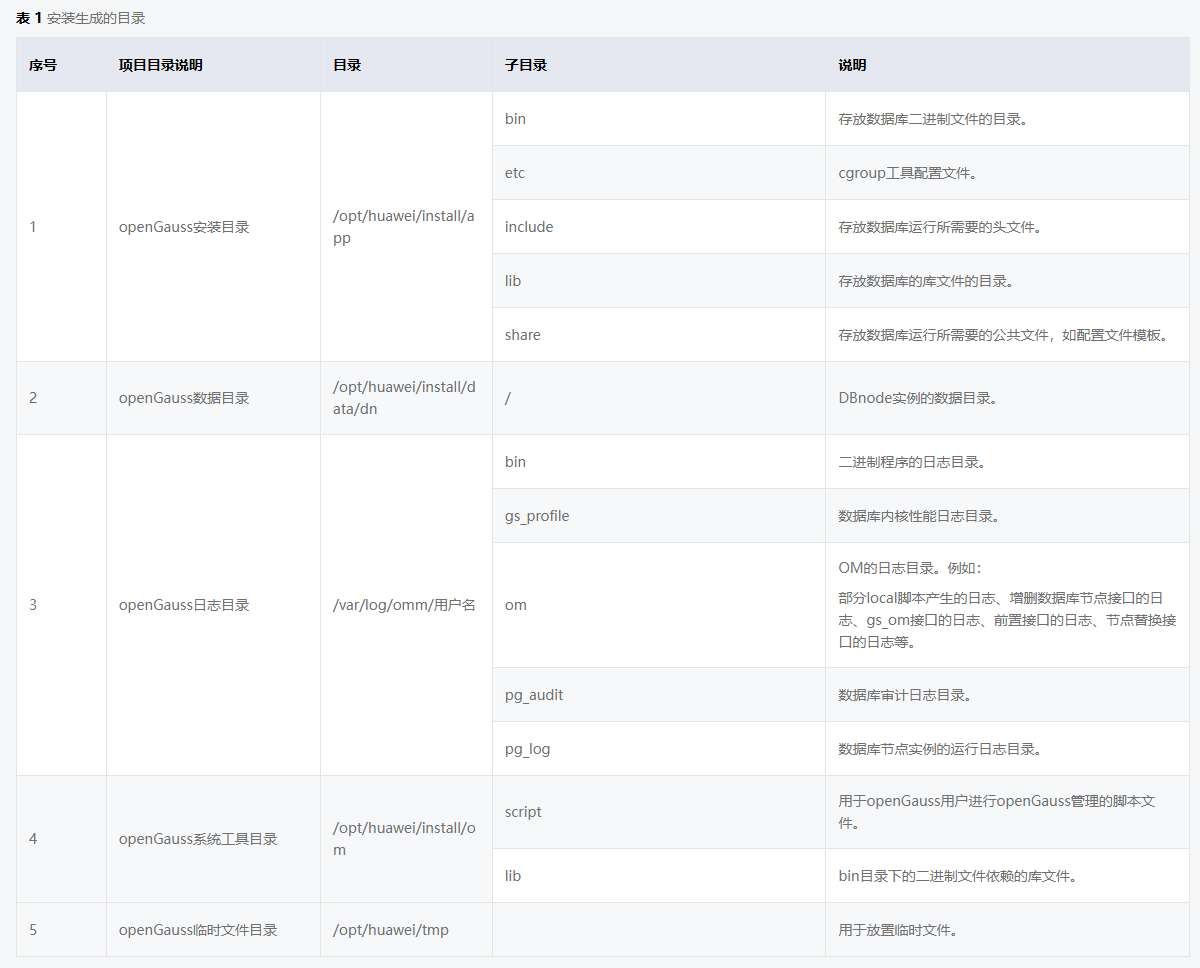
8.官方文档目录结构说明
安装后验证
[root@oula01 ~]$su - omm
[omm@oula01 ~]$ gs_om -t status
-----------------------------------------------------------------------cluster_name : dbCluster
cluster_state : Normal
redistributing : No-----------------------------------------------------------------------
[omm@oula01 dn]$ gs_ctl status -D /apps/huawei/install/data/dn
[2025-11-19 16:36:02.471][55437][][gs_ctl]: gs_ctl status,datadir is /apps/huawei/install/data/dn
gs_ctl: server is running (PID: 43306)
/apps/huawei/install/app/bin/gaussdb "-D" "/apps/huawei/install/data/dn"[omm@oula01 ~]$ gsql -d postgres -p 15400
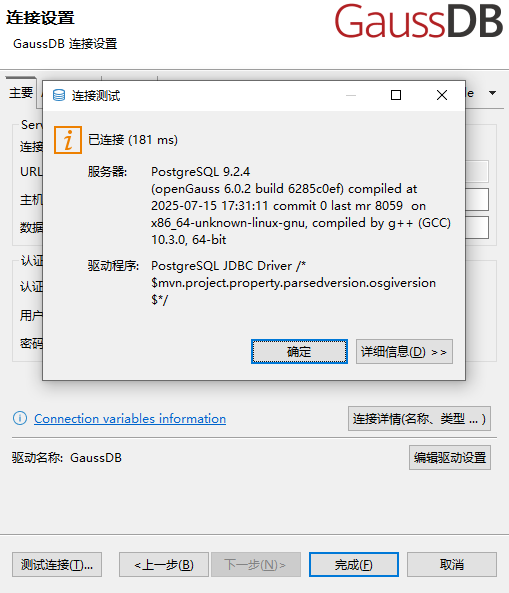
gsql ((openGauss 6.0.2 build 6285c0ef) compiled at 2025-07-15 17:31:11 commit 0 last mr 8059 )
Non-SSL connection (SSL connection is recommended when requiring high-security)
Type "help" for help.openGauss=#
做成系统服务
1.先手动关闭
[omm@oula01 dn]$ /apps/huawei/install/app/bin/gs_ctl stop -D /apps/huawei/install/data/dn
[2025-11-19 16:36:50.400][55444][][gs_ctl]: gs_ctl stopped ,datadir is /apps/huawei/install/data/dn
waiting for server to shut down.... done
server stopped
2.创建service文件
vim /etc/systemd/system/opengauss.service
[Unit]
Description=OpenGauss Database Server
After=network.target[Service]
Type=forking
User=omm
Group=dbgrp
Environment=GAUSSHOME=/apps/huawei/install/app
Environment=LD_LIBRARY_PATH=/apps/huawei/install/app/lib
WorkingDirectory=/apps/huawei/install/app
ExecStart=/apps/huawei/install/app/bin/gs_ctl start -D /apps/huawei/install/data/dn -Z single_node
ExecStop=/apps/huawei/install/app/bin/gs_ctl stop -D /apps/huawei/install/data/dn -Z single_node
ExecReload=/apps/huawei/install/app/bin/gs_ctl reload -D /apps/huawei/install/data/dn -Z single_node
Restart=on-failure
RestartSec=5
TimeoutSec=300[Install]
WantedBy=multi-user.target
3.重载systemd配置,开机自启动,启动数据库
systemctl daemon-reload
systemctl enable opengauss
systemctl start opengauss
创建数据库
常用sql
#查看所有数据库
openGauss=# SELECT datname FROM pg_database;datname
-----------template1template0postgres
(3 rows)
#查看当前数据库
openGauss=# SELECT current_database();current_database
------------------postgres
(1 row)
#查看所有模式
openGauss=# SELECT schema_name FROM information_schema.schemata;schema_name
--------------------pg_toastcstorepkg_servicedbe_perfsnapshotblockchaincoveragepg_catalogpublicsqladvisordbe_pldebuggerdbe_pldeveloperdbe_sql_utilinformation_schemadb4ai
(15 rows)
#查看进程
openGauss=# SELECT * FROM pg_stat_activity;
#查看某个用户下所有对象
SELECT n.nspname as schema_name,c.relname as table_name,c.relkind as type
FROM pg_class c
JOIN pg_namespace n ON n.oid = c.relnamespace
WHERE c.relowner = (SELECT oid FROM pg_roles WHERE rolname = 'aaaaaaa');
常用管理命令
# 连接工具
gsql -d database_name -p port -U username
# 管理命令
gs_ctl start/stop/status -D data_directory
gs_om -t status
常规创建数据库实例
##创建数据库的文件create_db_abc.sql
-- 创建数据库
CREATE DATABASE abc
ENCODING 'UTF8'
TEMPLATE template0
LC_COLLATE 'zh_CN.utf8'
LC_CTYPE 'zh_CN.utf8';
然后执行
gsql -d postgres -p 15400 -U omm -f create_db_abc.sql
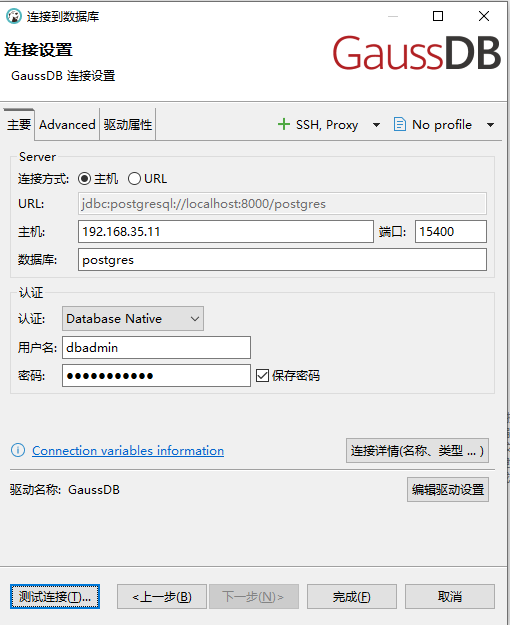
常规创建个管理员用户来远程连接数据库
-- 创建新的管理员用户
CREATE USER dbadmin WITHPASSWORD 'xxxxxx@123x'LOGINCREATEDBCREATEROLESYSADMINVALID UNTIL 'infinity';-- 授予必要权限
GRANT ALL PRIVILEGES ON DATABASE postgres TO dbadmin;
常规创建数据库用户和模式
-- 创建用户
-- 创建用户
CREATE USER yyyyyy
PASSWORD 'yyyyyy@123'
LOGIN
CREATEROLE
VALID UNTIL 'infinity';-- 连接到yhkj数据库执行以下操作
\c yhkj-- 创建模式
CREATE SCHEMA yyyyyy AUTHORIZATION yyyyyy;-- 授予权限
GRANT CONNECT ON DATABASE yhkj TO yyyyyy;
GRANT USAGE ON SCHEMA yyyyyy TO yyyyyy;
GRANT ALL PRIVILEGES ON SCHEMA yyyyyy TO yyyyyy;-- 设置默认权限
ALTER DEFAULT PRIVILEGES IN SCHEMA yyyyyy
GRANT ALL PRIVILEGES ON TABLES TO yyyyyy;ALTER DEFAULT PRIVILEGES IN SCHEMA yyyyyy
GRANT ALL PRIVILEGES ON SEQUENCES TO yyyyyy;ALTER DEFAULT PRIVILEGES IN SCHEMA yyyyyy
GRANT ALL PRIVILEGES ON FUNCTIONS TO yyyyyy;-- 设置搜索路径(可选)
-- ALTER USER yyyyyy SET search_path TO yyyyyy, public;


,删除多个不连续的列)


)

