bun test
Bun 附带了一个快速、内置、兼容 Jest 的测试运行程序。测试使用 Bun 运行时执行,并支持以下功能。
- TypeScript 和 JSX
- 生命周期 hooks
- 快照测试
- UI 和 DOM 测试
- 使用
--watch的监视模式 - 使用
--preload预加载脚本
Bun 旨在与 Jest 兼容,但并非所有内容都已实现。若要跟踪兼容性,请参阅此跟踪问题。
运行测试
bun test测试是用 JavaScript 或 TypeScript 编写的,带有类似 Jest 的 API。有关完整文档,请参阅编写测试。
// main.test.tsimport { expect, test } from "bun:test";test("2 + 2", () => {expect(2 + 2).toBe(4);
});
运行器以递归方式在工作目录中搜索与以下模式匹配的文件:
*.test.{js|jsx|ts|tsx}*_test.{js|jsx|ts|tsx}*.spec.{js|jsx|ts|tsx}*_spec.{js|jsx|ts|tsx}
您可以通过将其他位置参数传递给 bun test 来过滤要运行的测试文件集。路径与其中一个筛选器匹配的任何测试文件都将运行。通常,这些过滤器将是文件或目录名称;尚不支持 glob 模式。
bun test <filter> <filter> ...要按测试名称进行筛选,请使用 -t/--test-name-pattern 标志。
# run all tests or test suites with "addition" in the name
bun test --test-name-pattern addition
若要在测试运行程序中运行特定文件,请确保路径以 .// 或 / 开头,以将其与筛选器名称区分开来。
bun test ./test/specific-file.test.ts测试运行程序在单个进程中运行所有测试。它加载所有 --preload 脚本(有关详细信息,请参阅生命周期),然后运行所有测试。如果测试失败,测试运行程序将退出,并显示非零退出代码。
使用 --timeout 标志指定每个测试的超时(以毫秒为单位)。如果测试超时,它将被标记为失败。默认值为 5000。
# default value is 5000
bun test --timeout 20
使用 --rerun-each 标志可多次运行每个测试。这对于检测片状或非确定性测试失败非常有用。
bun test --rerun-each 100使用 --bail 标志在预定的测试失败次数后提前中止测试运行。默认情况下,Bun 将运行所有测试并报告所有故障,但有时在 CI 环境中,最好提前终止以减少 CPU 使用率。
# bail after 1 failure
bun test --bail# bail after 10 failure
bun test --bail 10
与 bun run 类似,您可以将 --watch 标志传递给 bun test,以监视更改并重新运行测试。
bun test --watch生命周期 hooks
Bun 支持以下生命周期钩子:
| Hook | 描述 |
|---|---|
beforeAll | 在所有测试之前运行一次。 |
beforeEach | 在每次测试之前运行。 |
afterEach | 在每次测试后运行。 |
afterAll | 在所有测试后运行一次。 |
这些钩子可以在测试文件中定义,也可以在预加载了 --preload 标志的单独文件中定义。
bun test --preload ./setup.ts有关完整文档,请参阅测试>生命周期。
Mocks
使用 bun.mock 创建 mock 函数。模拟在测试之间自动重置。
import { test, expect, mock } from "bun:test";
const random = mock(() => Math.random());test("random", () => {const val = random();expect(val).toBeGreaterThan(0);expect(random).toHaveBeenCalled();expect(random).toHaveBeenCalledTimes(1);
});
或者,您可以使用 jest.fn(),它的行为是完全相同的。
import { test, expect, jest } from "bun:test";const random = jest.fn(() => Math.random());有关完整文档,请参阅测试>模拟。
快照测试
bun test 支持快照测试。
// example usage of toMatchSnapshot
import { test, expect } from "bun:test";test("snapshot", () => {expect({ a: 1 }).toMatchSnapshot();
});
要更新快照,请使用 --update-snapshots 标志。
bun test --update-snapshots有关完整文档,请参阅测试>快照。
UI 和 DOM 测试
Bun 与流行的 UI 测试库兼容:
- HappyDOM快乐DOM
- DOM Testing LibraryDOM 测试库
- React Testing LibraryReact 测试库
有关完整文档,请参阅测试> DOM 测试。
性能
Bun 的测试运行速度很快。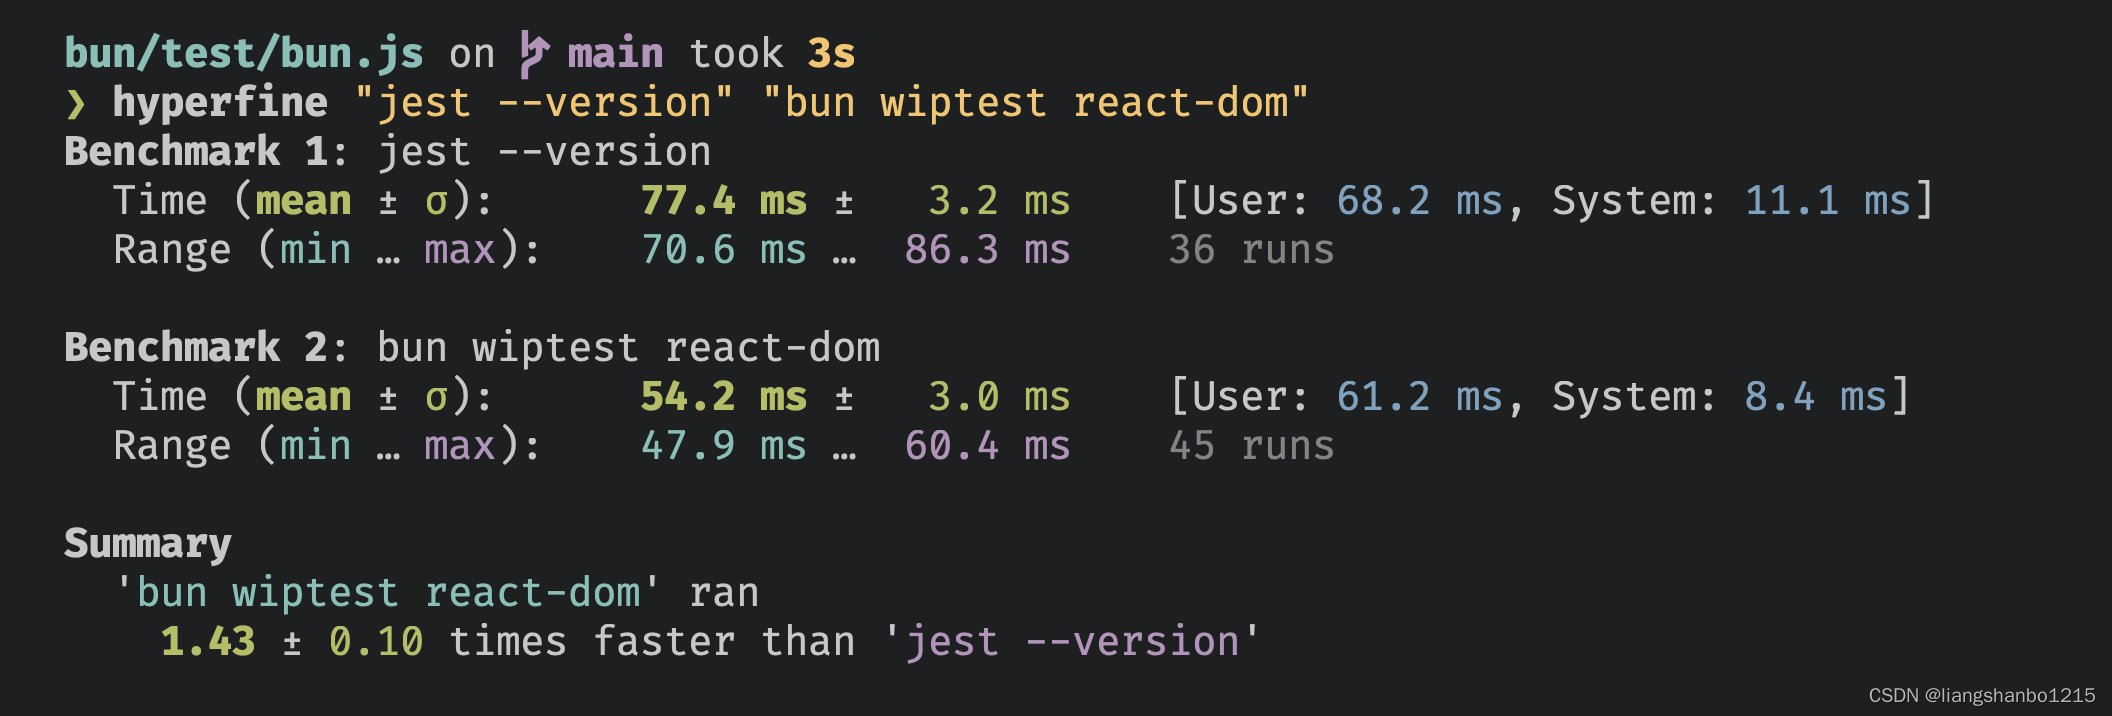
编写测试
从内置的 bun:test 模块中导入类似 Jest 的 API 来定义测试。从长远来看,Bun 旨在实现与 Jest 的完全兼容;目前,仅支持一组有限的 expect 匹配器。
基本用法
定义一个简单的测试:
// math.test.tsimport { expect, test } from "bun:test";test("2 + 2", () => {expect(2 + 2).toBe(4);
});
就像在 Jest 中一样,你可以在不导入它们的情况下使用 describe、test、expect 和其他函数。但与 Jest 不同,它们没有被注入到全局作用域中。相反,Bun 转译器会自动在内部注入一个来自 bun:test 的导入。
typeof globalThis.describe; // "undefined"
typeof describe; // "function"
这种转译器的集成仅在bun测试期间发生,并且只针对测试文件和预加载脚本。实际上,对于最终用户来说,这没有什么明显区别。
可以使用 describe 将测试分组为套件。
// main.test.tsimport { expect, test, describe } from "bun:test";describe("arithmetic", () => {test("2 + 2", () => {expect(2 + 2).toBe(4);});test("2 * 2", () => {expect(2 * 2).toBe(4);});
});
测试也可以是异步的。
import { expect, test } from "bun:test";test("2 * 2", async () => {const result = await Promise.resolve(2 * 2);expect(result).toEqual(4);
});
或者,使用 done 回调来标记完成。如果你在测试定义中将 done 回调作为一个参数包含进来,你必须调用它,否则测试将挂起。
import { expect, test } from "bun:test";test("2 * 2", done => {Promise.resolve(2 * 2).then(result => {expect(result).toEqual(4);done();});
});
可以通过给可选的第三个参数传递一个数字来指定每个测试的超时时间(以毫秒为单位)。
import { test } from "bun:test";test("wat", async () => {const data = await slowOperation();expect(data).toBe(42);
}, 500); // test must run in <500ms
test.skip
用 test.skip 跳过个别测试。这些测试将不会被运行。
import { expect, test } from "bun:test";test.skip("wat", () => {// TODO: fix thisexpect(0.1 + 0.2).toEqual(0.3);
});
test.todo
使用 test.todo 将测试标记为待办事项。这些测试将会运行,并且测试运行器会期望它们失败。如果它们通过了,那么将会提示你将它们标记为常规测试。
import { expect, test } from "bun:test";test.todo("fix this", () => {myTestFunction();
});
要仅运行标记为 todo 的测试,请使用 bun test --todo。
bun test --todotest.only
要运行特定的测试或测试套件,请使用 test.only() 或 describe.only()。一旦声明,运行 bun test --only 将只执行被标记为 .only() 的测试/测试套件。如果在声明了 test.only() 的情况下运行 bun test 但没有使用 --only 选项,那么将执行给定套件中所有测试,直到遇到带有 .only() 的测试。在两种执行场景中,describe.only() 的功能都相同。
import { test, describe } from "bun:test";test("test #1", () => {// does not run
});test.only("test #2", () => {// runs
});describe.only("only", () => {test("test #3", () => {// runs});
});
以下命令只会执行测试 #2 和 #3。
bun test --only以下命令会执行测试#1、#2和#3。
bun testtest.if
要条件性地运行测试,请使用 test.if()。如果条件为真值,则会运行测试。这对于仅在特定架构或操作系统上运行的测试特别有用。
test.if(Math.random() > 0.5)("runs half the time", () => {// ...
});const macOS = process.arch === "darwin";
test.if(macOS)("runs on macOS", () => {// runs if macOS
});
为了基于某些条件跳过测试,可以使用 test.skipIf() 或 describe.skipIf()。
const macOS = process.arch === "darwin";test.skipIf(macOS)("runs on non-macOS", () => {// runs if *not* macOS
});
test.each
要在测试表中为多个 case 返回一个函数,请使用test.each。
const cases = [[1, 2, 3], [3, 4, 5]];test.each(cases)("%p + %p should be %p", (a, b, expected) => {// runs once for each test case provided
})
根据标签的类型,可以对其格式进行多种设置。
%p | pretty-format |
%s | String |
%d | Number |
%i | Integer |
%f | Floating point |
%j | JSON |
%o | Object |
%# | Index of the test case |
%% | Single percent sign (%) |
匹配器
Bun 实现了以下匹配器。全面兼容 Jest 的路线图正在制定中;在这里跟踪进度。
| ✅ | .not |
| ✅ | .toBe() |
| ✅ | .toEqual() |
| ✅ | .toBeNull() |
| ✅ | .toBeUndefined() |
| ✅ | .toBeNaN() |
| ✅ | .toBeDefined() |
| ✅ | .toBeFalsy() |
| ✅ | .toBeTruthy() |
| ✅ | .toContain() |
| ✅ | .toStrictEqual() |
| ✅ | .toThrow() |
| ✅ | .toHaveLength() |
| ✅ | .toHaveProperty() |
| ✅ | .extend |
| ✅ | .anything() |
| ✅ | .any() |
| ✅ | .arrayContaining() |
| ❌ | .assertions() |
| ✅ | .closeTo() |
| ❌ | .hasAssertions() |
| ✅ | .objectContaining() |
| ✅ | .stringContaining() |
| ✅ | .stringMatching() |
| ❌ | .addSnapshotSerializer() |
| ✅ | .resolves() |
| ✅ | .rejects() |
| ✅ | .toHaveBeenCalled() |
| ✅ | .toHaveBeenCalledTimes() |
| ✅ | .toHaveBeenCalledWith() |
| ✅ | .toHaveBeenLastCalledWith() |
| ✅ | .toHaveBeenNthCalledWith() |
| ❌ | .toHaveReturned() |
| ❌ | .toHaveReturnedTimes() |
| ❌ | .toHaveReturnedWith() |
| ❌ | .toHaveLastReturnedWith() |
| ❌ | .toHaveNthReturnedWith() |
| ✅ | .toBeCloseTo() |
| ✅ | .toBeGreaterThan() |
| ✅ | .toBeGreaterThanOrEqual() |
| ✅ | .toBeLessThan() |
| ✅ | .toBeLessThanOrEqual() |
| ✅ | .toBeInstanceOf() |
| ✅ | .toContainEqual() |
| ✅ | .toMatch() |
| ✅ | .toMatchObject() |
| ✅ | .toMatchSnapshot() |
| ❌ | .toMatchInlineSnapshot() |
| ❌ | .toThrowErrorMatchingSnapshot() |
| ❌ | .toThrowErrorMatchingInlineSnapshot() |
生命周期钩子
测试运行器支持以下生命周期钩子。这对于加载测试装置、模拟数据和配置测试环境非常有用。
使用 beforeEach 和 afterEach 来执行每个测试的设置和拆卸逻辑。
import { beforeEach, afterEach } from "bun:test";beforeEach(() => {console.log("running test.");
});afterEach(() => {console.log("done with test.");
});
使用 beforeAll 和 afterAll 执行每个范围的设置和拆卸逻辑。范围由定义钩子的位置决定。
将钩子范围限定为特定的 describe 块:
import { describe, beforeAll } from "bun:test";describe("test group", () => {beforeAll(() => {// setup});// tests...
});
将钩子范围限定在测试文件:
import { describe, beforeAll } from "bun:test";beforeAll(() => {// setup
});describe("test group", () => {// tests...
});
为了将整个多文件测试运行范围限定在挂钩内,请在单独的文件中定义这些挂钩。
// setup.tsimport { beforeAll, afterAll } from "bun:test";beforeAll(() => {// global setup
});afterAll(() => {// global teardown
});
然后使用 --preload 在任何测试文件之前运行设置脚本。
$ bun test --preload ./setup.ts
为了避免每次运行测试时都需要输入 “--preload”,您可以将其添加到 bunfig.toml 文件中:
[test]
preload = ["./setup.ts"]
Mocks
使用模拟函数创建模拟数据。
import { test, expect, mock } from "bun:test";
const random = mock(() => Math.random());test("random", async () => {const val = random();expect(val).toBeGreaterThan(0);expect(random).toHaveBeenCalled();expect(random).toHaveBeenCalledTimes(1);
});
另外,你也可以像Jest中那样使用 jest.fn() 函数,它的行为方式是完全一样的。
import { test, expect, jest } from "bun:test";
const random = jest.fn(() => Math.random());test("random", async () => {const val = random();expect(val).toBeGreaterThan(0);expect(random).toHaveBeenCalled();expect(random).toHaveBeenCalledTimes(1);
});
mock() 的结果是一个被添加了一些额外属性的新函数。
import { mock } from "bun:test";
const random = mock((multiplier: number) => multiplier * Math.random());random(2);
random(10);random.mock.calls;
// [[ 2 ], [ 10 ]]random.mock.results;
//  [
//    { type: "return", value: 0.6533907460954099 },
//    { type: "return", value: 0.6452713933037312 }
//  ]
以下属性和方法在模拟函数上实现。
mockFn.getMockName()
mockFn.mock.calls
mockFn.mock.results
mockFn.mock.instances
mockFn.mock.contexts
mockFn.mock.lastCall
mockFn.mockClear()
mockFn.mockReset()
mockFn.mockRestore()
mockFn.mockImplementation(fn)
mockFn.mockImplementationOnce(fn)
mockFn.mockName(name)
mockFn.mockReturnThis()
mockFn.mockReturnValue(value)
mockFn.mockReturnValueOnce(value)
mockFn.mockResolvedValue(value)
mockFn.mockResolvedValueOnce(value)
mockFn.mockRejectedValue(value)
mockFn.mockRejectedValueOnce(value)
mockFn.withImplementation(fn, callback)
.spyOn()
可以使用SpyOn()创建一个Spy来跟踪对函数的调用,而无需将其替换为模拟函数。这些Spy可以传递给.toHaveBeenCalled()和.toHaveBeenCalledTimes()。
import { test, expect, spyOn } from "bun:test";const ringo = {name: "Ringo",sayHi() {console.log(`Hello I'm ${this.name}`);},
};const spy = spyOn(ringo, "sayHi");test("spyon", () => {expect(spy).toHaveBeenCalledTimes(0);ringo.sayHi();expect(spy).toHaveBeenCalledTimes(1);
});
mock.module
模块模拟允许你覆盖一个模块的行为。使用 mock.module(path: string, callback: () => Object) 来模拟一个模块。
import { test, expect, mock } from "bun:test";mock.module("./module", () => {return {foo: "bar",};
});test("mock.module", async () => {const esm = await import("./module");expect(esm.foo).toBe("bar");const cjs = require("./module");expect(cjs.foo).toBe("bar");
});
像 Bun 的其余部分一样,模块 mocks 同时支持import和require。
覆盖已导入的模块
如果你需要覆盖一个已经被导入的模块,你不需要做什么特别的事情。只需要调用 mock.module(),模块就会被覆盖。
import { test, expect, mock } from "bun:test";// The module we're going to mock is here:
import { foo } from "./module";test("mock.module", async () => {const cjs = require("./module");expect(foo).toBe("bar");expect(cjs.foo).toBe("bar");// We update it here:mock.module("./module", () => {return {foo: "baz",};});// And the live bindings are updated.expect(foo).toBe("baz");// The module is also updated for CJS.expect(cjs.foo).toBe("baz");
});
提升和预加载
如果你需要在导入模块之前确保对其进行模拟,你应该使用 --preload 在运行测试之前加载你的模拟。
// my-preload.ts
import { mock } from "bun:test";mock.module("./module", () => {return {foo: "bar",};
});
bun test --preload ./my-preload你可以在 bunfig.toml 文件中添加 preload:
[test]
# Load these modules before running tests.
preload = ["./my-preload"]
如果我 mock 一个已经被导入的模块,会发生什么?
如果你 mock 一个已经被导入的模块,该模块将在模块缓存中被更新。这意味着任何导入该模块的模块都将获得被 mock 的版本,但原始模块仍然会被评估。这意味着原始模块的任何副作用仍然会发生。
如果你想防止原始模块被评估,你应该在测试运行前使用 --preload 来加载你的模拟模块。
__mocks__目录和自动模拟
目前尚不支持自动模拟。如果这阻止了你切换到Bun,请提交一个issue。
实现细节
模块模拟对 ESM 和 CommonJS 模块有不同的实现。对于ES模块,我们在 JavaScriptCore 中添加了补丁,允许 Bun 在运行时覆盖导出值并递归更新实时绑定。
从 Bun v1.0.19 开始,Bun会自动解析 mock.module() 中的规范参数,就像你进行了导入一样。如果解析成功,那么解析后的规范字符串将用作模块缓存中的键。这意味着你可以使用相对路径、绝对路径甚至模块名称。如果规范未解析,则使用原始规范作为模块缓存中的键。
解析后,被模拟的模块将存储在ES模块注册表和 CommonJS require 缓存中。这意味着你可以对模拟模块交替使用import和require。
回调函数是惰性调用的,只有当模块被导入或要求时才会调用。这意味着你可以使用mock.module()来模拟尚不存在的模块,而且你还可以使用mock.module()来模拟其他模块导入的模块。
日期和时间
bun:test 允许你在测试中更改时间。
这可以与以下任一项一起使用:
- Date.now
- new Date()
- new Intl.DateTimeFormat().format()
计时器目前暂不支持,但可能在 Bun 的未来版本中支持。
setSystemTime
要更改系统时间,请使用 setSystemTime:
import { setSystemTime, beforeAll, test, expect } from "bun:test";beforeAll(() => {setSystemTime(new Date("2020-01-01T00:00:00.000Z"));
});test("it is 2020", () => {expect(new Date().getFullYear()).toBe(2020);
});
为了支持使用 Jest 的 useFakeTimers 和 useRealTimers 的进行测试,可以使用 useFakeTimers 和 useRealTimers:
test("just like in jest", () => {jest.useFakeTimers();jest.setSystemTime(new Date("2020-01-01T00:00:00.000Z"));expect(new Date().getFullYear()).toBe(2020);jest.useRealTimers();expect(new Date().getFullYear()).toBeGreaterThan(2020);
});test("unlike in jest", () => {const OriginalDate = Date;jest.useFakeTimers();if (typeof Bun === "undefined") {// In Jest, the Date constructor changes// That can cause all sorts of bugs because suddenly Date !== Date before the test.expect(Date).not.toBe(OriginalDate);expect(Date.now).not.toBe(OriginalDate.now);} else {// In bun:test, Date constructor does not change when you useFakeTimersexpect(Date).toBe(OriginalDate);expect(Date.now).toBe(OriginalDate.now);}
});
计时器 - 请注意,我们尚未实现用于模拟计时器的内置支持,但这在规划之中。
重置系统时间
要重置系统时间,不向 setSystemTime 传递任何参数:
import { setSystemTime, expect, test } from "bun:test";test("it was 2020, for a moment.", () => {// Set it to something!setSystemTime(new Date("2020-01-01T00:00:00.000Z"));expect(new Date().getFullYear()).toBe(2020);// reset it!setSystemTime();expect(new Date().getFullYear()).toBeGreaterThan(2020);
});
设置时区
要更改时区,可以将 $TZ 环境变量传递给 bun test。
TZ=America/Los_Angeles bun test或在运行时设置 process.env.TZ:
import { test, expect } from "bun:test";test("Welcome to California!", () => {process.env.TZ = "America/Los_Angeles";expect(new Date().getTimezoneOffset()).toBe(420);expect(new Intl.DateTimeFormat().resolvedOptions().timeZone).toBe("America/Los_Angeles",);
});test("Welcome to New York!", () => {// Unlike in Jest, you can set the timezone multiple times at runtime and it will work.process.env.TZ = "America/New_York";expect(new Date().getTimezoneOffset()).toBe(240);expect(new Intl.DateTimeFormat().resolvedOptions().timeZone).toBe("America/New_York",);
});


)


详细流程)


)

