1、安装usb_cam包
pip install pydantic==1.10.14sudo apt install ros-humble-usb-cam# 测试打开相机
ros2 launch usb_cam camera.launch.py# 显示图像
ros2 run image_view image_view image:=/camera1/image_raw
2、安装 camera_calibration
sudo apt install ros-humble-camera-calibration3、执行标定程序
ros2 run camera_calibration cameracalibrator --size 9x6 --square 0.026 image:=/camera1/image_raw camera:=/usb_cam参数说明:
- --size 当前标定板大小
- --square 每个小棋盘格的边长,单位米
- image:=/camera1/image_raw 图像来源主题
- camera:=/usb_cam 相机名称
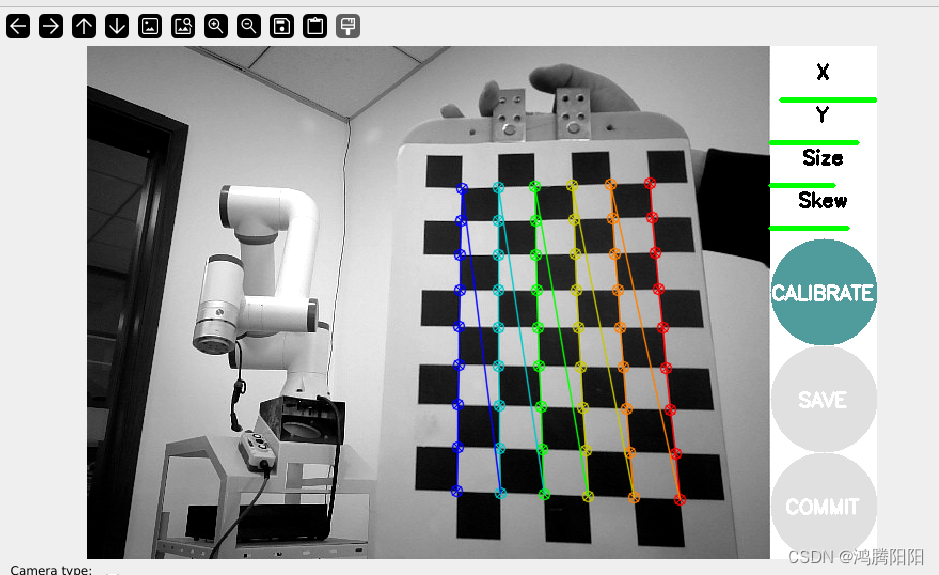
4、通过不停的移动标定板:直到X、Y、Size、Skew四个都变成绿色,点击CALIBRATE按钮;
完成后可点击“save”进行保存,文件保存路径在终端里有显示。再次将标定板放在视野里时,右上角会出现一个数值,代表标定误差。
5、点击SAVE按钮
结果以压缩包形式保存在:/tmp/calibrationdata.tar.gz中。
image_width: 640
image_height: 480
camera_name: narrow_stereo
camera_matrix:rows: 3cols: 3data: [620.78764,   0.     , 301.03635,0.     , 623.18712, 249.98162,0.     ,   0.     ,   1.     ]
distortion_model: plumb_bob
distortion_coefficients:rows: 1cols: 5data: [0.156418, -0.248802, 0.003859, -0.003760, 0.000000]
rectification_matrix:rows: 3cols: 3data: [1., 0., 0.,0., 1., 0.,0., 0., 1.]
projection_matrix:rows: 3cols: 4data: [635.97443,   0.     , 298.43981,   0.     ,0.     , 638.92316, 251.00522,   0.     ,0.     ,   0.     ,   1.     ,   0.     ]
image_height、image_width:图片的高、宽
camera_name:摄像头名
camera_matrix:摄像头的内部参数矩阵
distortion_model:畸变模型
distortion_coefficients:畸变模型的系数
rectification_matrix:为矫正矩阵,一般为单位阵
projection_matrix:为外部世界坐标到像平面的投影矩阵


)

常见指令的常见用法(上))


)


