NFS是网络文件系统Network File System的缩写,NFS服务器可以让PC将网络中的NFS服务器共享的目录挂载到本地的文件系统中,而在本地的系统中来看,那个远程主机的目录就好像是自己的一个磁盘分区一样。
kubernetes使用NFS共享存储有两种方式:
1.手动方式静态创建所需要的PV和PVC。
2.通过创建PVC动态地创建对应PV,无需手动创建PV。
下面对这两种方式进行配置并进行演示。
一、搭建NFS服务器
k8s集群准备,以这篇文章为例:https://www.toutiao.com/i6768745162030973447/?group_id=6768745162030973447
这里演示在master节点上部署NFS服务器。服务器操作系统:Centos7.5.
#master节点安装nfsyum -y install nfs-utils#创建nfs目录mkdir /data#修改权限chmod -R 777 /data#编辑export文件vim /etc/exports/data *(rw,no_root_squash,sync)#配置生效exportfs -r#查看生效exportfs#启动rpcbind、nfs服务systemctl restart rpcbind && systemctl enable rpcbindsystemctl restart nfs && systemctl enable nfs#所有node节点安装客户端 (很重要)yum -y install nfs-utils systemctl start nfs && systemctl enable nfs #查看 RPC 服务的注册状况rpcinfo -p localhost#showmount测试showmount -e 10.211.55.4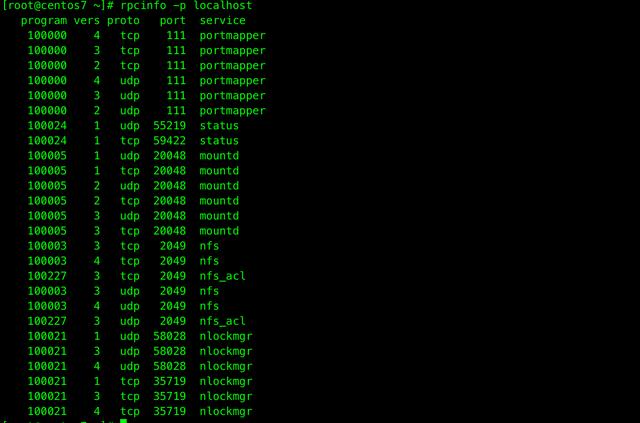

二、静态申请PV卷
添加pv卷对应目录,这里创建1个pv卷,则添加1个pv卷的目录作为挂载点。
#创建pv卷对应的目录mkdir -p /data/pv01#配置exportrsvim /etc/exports/data *(rw,no_root_squash,sync)/data/pv01 *(rw,no_root_squash,sync)#配置生效exportfs -r#重启rpcbind、nfs服务systemctl restart rpcbind && systemctl restart nfs创建PV
下面创建1个名为pv01的PV卷,配置文件 nfspv01.yaml 如下:
apiVersion: v1kind: PersistentVolumemetadata: name: nfspv01 labels: pv: nfspv01spec: capacity: storage: 1Gi accessModes: - ReadWriteOnce persistentVolumeReclaimPolicy: Recycle storageClassName: nfs nfs: path: /data/pv01 server: 10.211.55.4 配置说明:
① capacity 指定 PV 的容量为 1G。
② accessModes 指定访问模式为 ReadWriteOnce,支持的访问模式有:
ReadWriteOnce – PV 能以 read-write 模式 mount 到单个节点。
ReadOnlyMany – PV 能以 read-only 模式 mount 到多个节点。
ReadWriteMany – PV 能以 read-write 模式 mount 到多个节点。
③ persistentVolumeReclaimPolicy 指定当 PV 的回收策略为 Recycle,支持的策略有:
Retain – 需要管理员手工回收。
Recycle – 清除 PV 中的数据,效果相当于执行 rm -rf /thevolume/*。
Delete – 删除 Storage Provider 上的对应存储资源,例如 AWS EBS、GCE PD、Azure
Disk、OpenStack Cinder Volume 等。
④ storageClassName 指定 PV 的 class 为 nfs。相当于为 PV 设置了一个分类,PVC 可以指定 class 申请相应 class 的PV。
⑤ 指定 PV 在 NFS 服务器上对应的目录
创建PV命令:kubectl create -f nfspv01.yaml
创建成功后查看PV:kubectl get pv

创建PVC
接下来创建一个名为pvc01的PVC,配置文件 nfspvc01.yaml 如下:
apiVersion: v1kind: PersistentVolumeClaimmetadata: name: nfspvc01spec: accessModes: - ReadWriteOnce resources: requests: storage: 1Gi storageClassName: nfs selector: matchLabels: pv: nfspv01创建PVC命令: kubectl create -f nfspvc01.yaml
创建成功后查看PVC:kubectl get pvc

创建测试POD
Pod 配置文件 nfspodtest.yaml 如下:
kind: PodapiVersion: v1metadat: name: nfspodtestspec: containers: - name: nfspodtest image: nginx volumeMounts: - mountPath: "/var/www/html" name: nfsvolumetest volumes: - name: nfsvolumetest persistentVolumeClaim: claimName: nfspvc01创建POD命令:kubectl create -f nfspodtest.yaml
查看POD命令:kubectl get pod

验证 PV
进入容器目录创建文件:kubectl exec nfspodtest touch /var/www/html/test.html
查看NFS服务器真实目录: ll /data/pv01

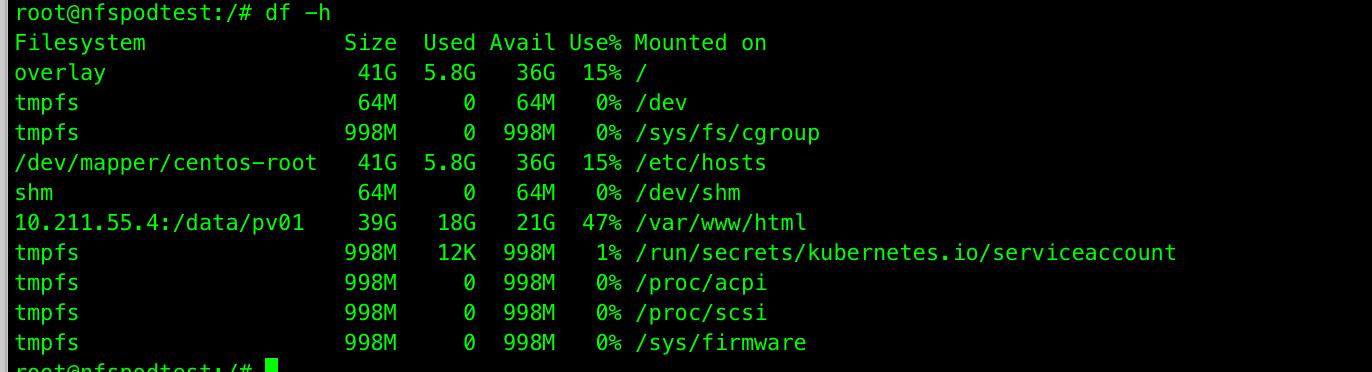
进入pod查看挂载情况
kubectl exec -it nfspodtest /bin/bash
root@nfs-pod001:/# df -h
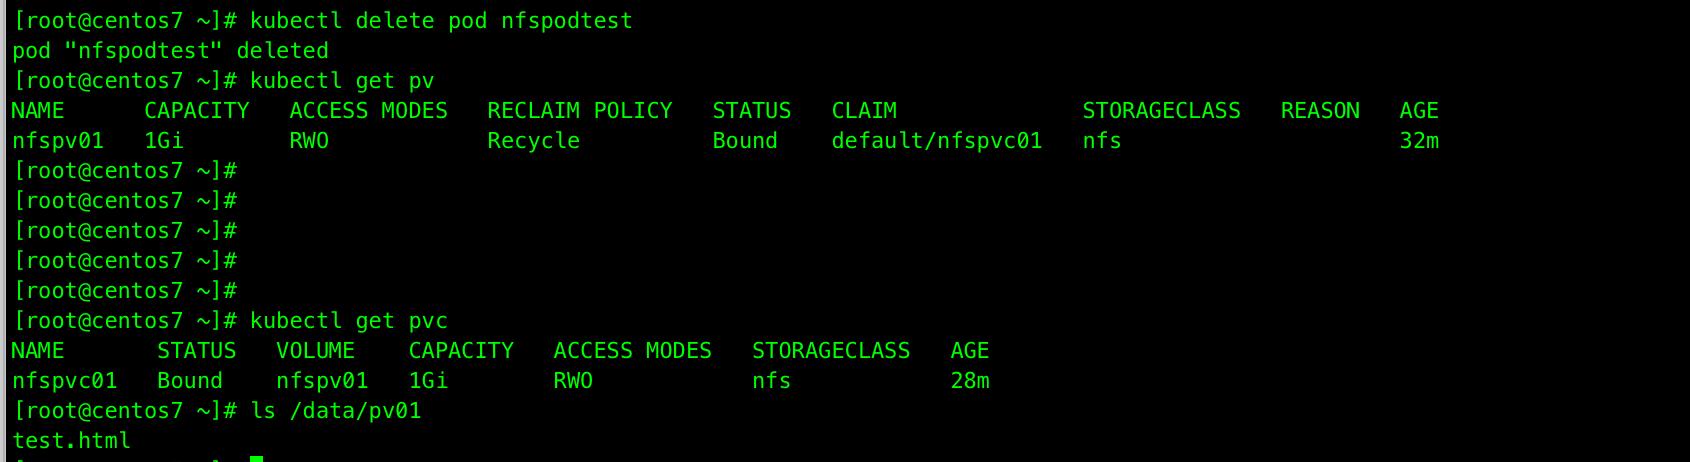
删除pv
删除pod,pv和pvc不会被删除,nfs存储的数据不会被删除。
删除POD命令: kubectl delete pod nfspodtest
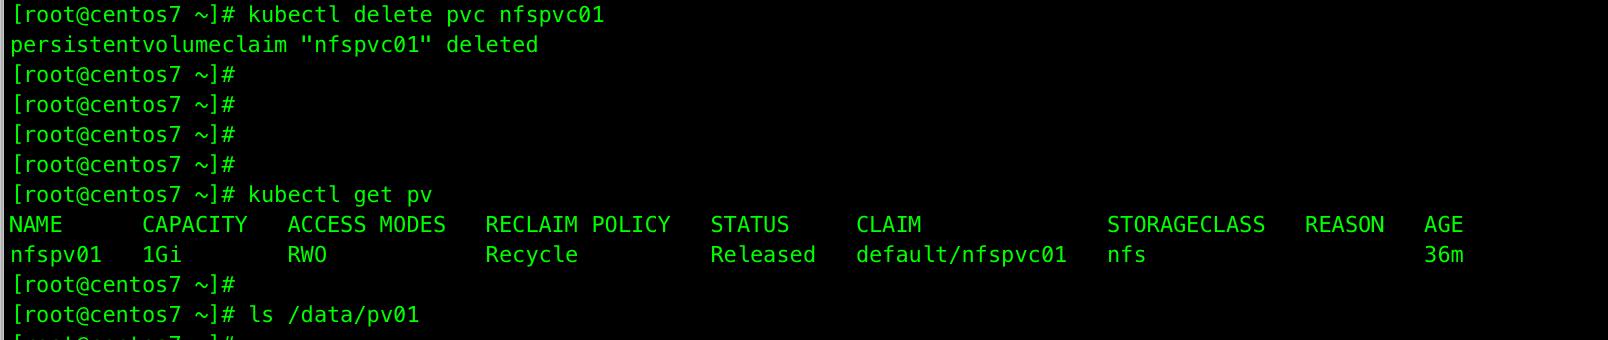
删除pvc,pv将被释放,处于 Available 可用状态,并且nfs存储中的数据被删除。
删除PVC命令: kubectl delete pvc nfspvc01
删除pv
删除PV命令: kubectl delete pv nfspv01

动态申请PV卷
External NFS驱动的工作原理
K8S的外部NFS驱动,可以按照其工作方式(是作为NFS server还是NFS client)分为两类:
1.nfs-client:
也就是我们接下来演示的这一类,它通过K8S的内置的NFS驱动挂载远端的NFS服务器到本地目录;然后将自身作为storage provider,关联storage class。当用户创建对应的PVC来申请PV时,该provider就将PVC的要求与自身的属性比较,一旦满足就在本地挂载好的NFS目录中创建PV所属的子目录,为Pod提供动态的存储服务。
2.nfs:
与nfs-client不同,该驱动并不使用k8s的NFS驱动来挂载远端的NFS到本地再分配,而是直接将本地文件映射到容器内部,然后在容器内使用ganesha.nfsd来对外提供NFS服务;在每次创建PV的时候,直接在本地的NFS根目录中创建对应文件夹,并export出该子目录。
利用NFS动态提供Kubernetes后端存储卷
本文将介绍使用nfs-client-provisioner这个应用,利用NFS Server给Kubernetes作为持久存储的后端,并且动态提供PV。前提条件是有已经安装好的NFS服务器,并且NFS服务器与Kubernetes的Slave节点都能网络连通。将nfs-client驱动做一个deployment部署到K8S集群中,然后对外提供存储服务。nfs-client-provisioner 是一个Kubernetes的简易NFS的外部provisioner,本身不提供NFS,需要现有的NFS服务器提供存储
部署nfs-client-provisioner
首先克隆仓库获取yaml文件
git clone https://github.com/kubernetes-incubator/external-storage.git
cp -R external-storage/nfs-client/deploy/ $HOME
cd deploy
配置授权
如果集群启用了RBAC,则必须执行如下命令授权provisioner,rbac.yaml文件内容:
apiVersion: v1kind: ServiceAccountmetadata: name: nfs-client-provisioner # replace with namespace where provisioner is deployed namespace: default---kind: ClusterRoleapiVersion: rbac.authorization.k8s.io/v1metadata: name: nfs-client-provisioner-runnerrules: - apiGroups: [""] resources: ["persistentvolumes"] verbs: ["get", "list", "watch", "create", "delete"] - apiGroups: [""] resources: ["persistentvolumeclaims"] verbs: ["get", "list", "watch", "update"] - apiGroups: ["storage.k8s.io"] resources: ["storageclasses"] verbs: ["get", "list", "watch"] - apiGroups: [""] resources: ["events"] verbs: ["create", "update", "patch"]---kind: ClusterRoleBindingapiVersion: rbac.authorization.k8s.io/v1metadata: name: run-nfs-client-provisionersubjects: - kind: ServiceAccount name: nfs-client-provisioner # replace with namespace where provisioner is deployed namespace: defaultroleRef: kind: ClusterRole name: nfs-client-provisioner-runner apiGroup: rbac.authorization.k8s.io---kind: RoleapiVersion: rbac.authorization.k8s.io/v1metadata: name: leader-locking-nfs-client-provisioner # replace with namespace where provisioner is deployed namespace: defaultrules: - apiGroups: [""] resources: ["endpoints"] verbs: ["get", "list", "watch", "create", "update", "patch"]---kind: RoleBindingapiVersion: rbac.authorization.k8s.io/v1metadata: name: leader-locking-nfs-client-provisionersubjects: - kind: ServiceAccount name: nfs-client-provisioner # replace with namespace where provisioner is deployed namespace: defaultroleRef: kind: Role name: leader-locking-nfs-client-provisioner apiGroup: rbac.authorization.k8s.io命令: kubectl create -f rbac.yaml
修改deployment.yaml文件
这里修改的参数包括NFS服务器所在的IP地址(10.211.55.4),以及NFS服务器共享的路径(/data),两处都需要修改为你实际的NFS服务器和共享目录。
apiVersion: apps/v1kind: Deploymentmetadata: name: nfs-client-provisioner labels: app: nfs-client-provisioner # replace with namespace where provisioner is deployed namespace: defaultspec: replicas: 1 selector: matchLabels: app: nfs-client-provisioner strategy: type: Recreate selector: matchLabels: app: nfs-client-provisioner template: metadata: labels: app: nfs-client-provisioner spec: serviceAccountName: nfs-client-provisioner containers: - name: nfs-client-provisioner image: willdockerhub/nfs-client-provisioner:latest volumeMounts: - name: nfs-client-root mountPath: /persistentvolumes env: - name: PROVISIONER_NAME value: fuseim.pri/ifs - name: NFS_SERVER value: 10.211.55.4 - name: NFS_PATH value: /data volumes: - name: nfs-client-root nfs: server: 10.211.55.4 path: /data执行命令:kubectl create-f deployment.yaml
查看POD:kubectl get pod

创建StorageClass
class.yaml 文件内容: kubectl create -f class.yaml
apiVersion: storage.k8s.io/v1kind: StorageClassmetadata: name: managed-nfs-storageprovisioner: fuseim.pri/ifs # or choose another name, must match deployment's env PROVISIONER_NAME'parameters: archiveOnDelete: "false"查看创建的storageclass: kubectl get sc

创建测试PVC
test-claim.yaml文件内容:
kind: PersistentVolumeClaimapiVersion: v1metadata: name: test-claim annotations: volume.beta.kubernetes.io/storage-class: "managed-nfs-storage"spec: accessModes: - ReadWriteMany resources: requests: storage: 1Mi命令:kubectl create -f test-claim.yaml
查看PVC,自动创建的PV,它们的绑定关系:

查看NFS服务器实际目录, 我们进入到NFS的export目录,可以看到对应该volume name的目录已经创建出来了。其中volume的名字是namespace,PVC name以及uuid的组合:

创建测试Pod
test-pod.yaml 文件内容:
kind: PodapiVersion: v1metadata: name: test-podspec: containers: - name: test-pod image: gcr.io/google_containers/busybox:1.24 command: - "/bin/sh" args: - "-c" - "touch /mnt/SUCCESS && exit 0 || exit 1" volumeMounts: - name: nfs-pvc mountPath: "/mnt" restartPolicy: "Never" volumes: - name: nfs-pvc persistentVolumeClaim: claimName: test-claim命令:kubectl create -f test-pod.yaml
查看POD,实际目录有无产生文件:

清理测试环境
删除测试POD:kubectl delete -f test-pod.yaml
删除测试PVC: kubectl delete -f test-claim.yaml
发现在NFS服务器上的共享目录下查看NFS的PV卷已经被删除:


 方法)


