手势识别系列文章目录
手势识别是一种人机交互技术,通过识别人的手势动作,从而实现对计算机、智能手机、智能电视等设备的操作和控制。
1. opencv实现手部追踪(定位手部关键点)
2.opencv实战项目 实现手势跟踪并返回位置信息(封装调用)
3.手势识别-手势音量控制(opencv)
4.opencv实战项目 手势识别-手势控制鼠标
未完待续
本专栏记录作者的学习之旅会一直更新下去,欢迎订阅一起学习进步
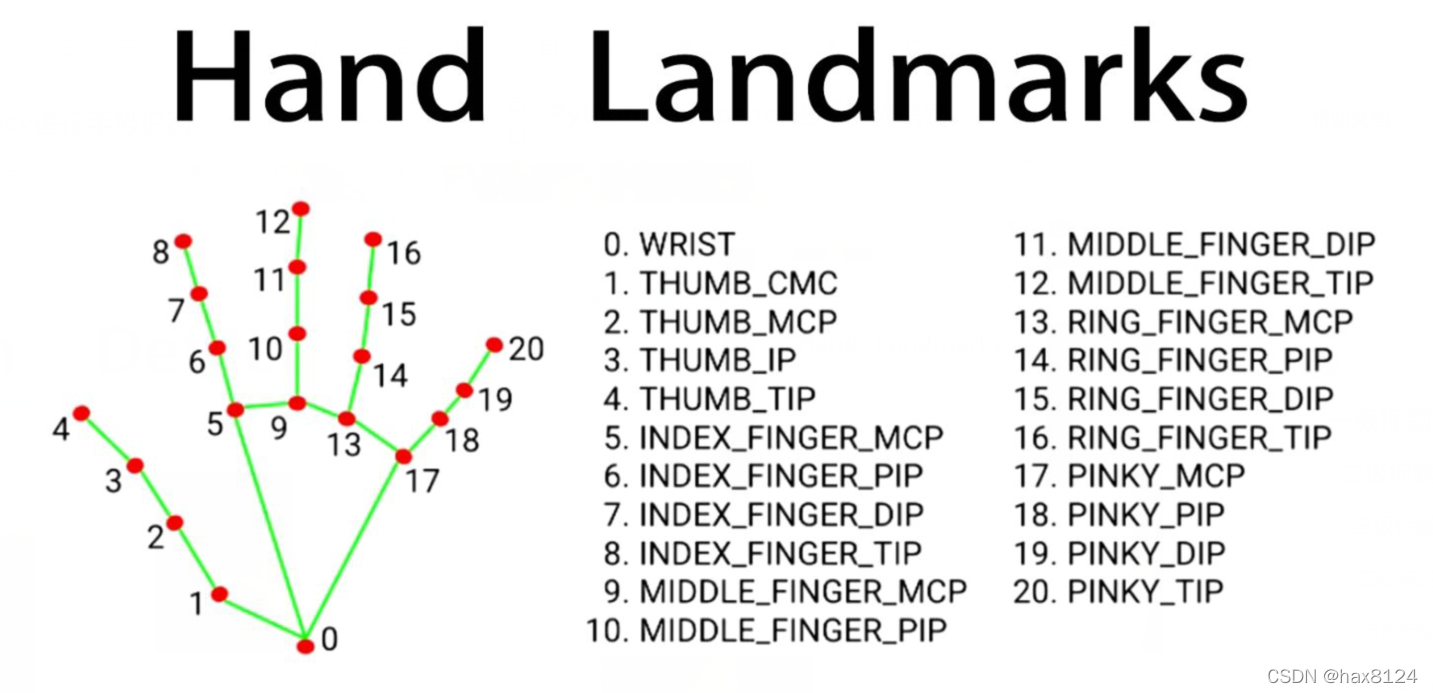
本项目是使用了谷歌开源的框架mediapipe,里面有非常多的模型提供给我们使用,例如面部检测,身体检测,手部检测等
代码需要用到opencv HandTraqckModule模块 mediapipe模块和一个鼠标控制模块autopy
一、HandTraqckModule模块
前面的文章中有封装手部检测模块的教程,这边简单的介绍一下
import cv2
import mediapipe as mp
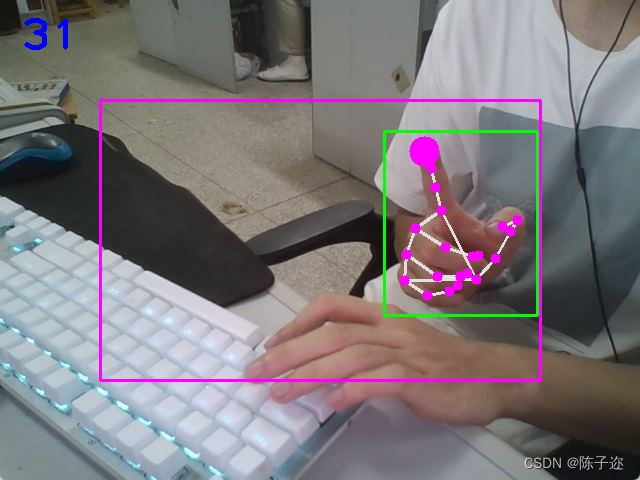
import timeclass handDetector():def __init__(self, mode=False, maxHands=2, detectionCon=0.5, trackCon=0.5):"""初始化手势检测器对象。Args:mode (bool): 是否检测多只手。默认为False,只检测单只手。maxHands (int): 最多检测的手的数量。默认为2。detectionCon (float): 手势检测的置信度阈值。默认为0.5。trackCon (float): 手势跟踪的置信度阈值。默认为0.5。"""self.mode = modeself.maxHands = maxHandsself.detectionCon = detectionConself.trackCon = trackCon# 创建 Mediapipe Hands 模块和绘制工具对象self.mpHands = mp.solutions.handsself.hands = self.mpHands.Hands(self.mode, self.maxHands,self.detectionCon, self.trackCon)self.mpDraw = mp.solutions.drawing_utilsself.tipIds = [4, 8, 12, 16, 20]def findHands(self, img, draw=True):"""检测手势并在图像上绘制关键点和连接线。Args:img (numpy.ndarray): 输入图像。draw (bool): 是否在图像上绘制标记。默认为True。Returns:numpy.ndarray: 绘制了关键点和连接线的图像。"""imgRGB = cv2.cvtColor(img, cv2.COLOR_BGR2RGB)self.results = self.hands.process(imgRGB)if self.results.multi_hand_landmarks:for handLms in self.results.multi_hand_landmarks:if draw:self.mpDraw.draw_landmarks(img, handLms,self.mpHands.HAND_CONNECTIONS)return img
这是第一个小模块,用于创建手势检测器对象以及进行手势检测并在图像上绘制关键点和连接线。下面是对第一个小模块的详细解释:
-
handDetector类:定义了手势检测器对象,它具有以下初始化参数和方法。-
__init__(self, mode=False, maxHands=2, detectionCon=0.5, trackCon=0.5):初始化函数,创建手势检测器对象并设置相关参数。mode:是否检测多只手,默认为False。maxHands:最多检测的手的数量,默认为2。detectionCon:手势检测的置信度阈值,默认为0.5。trackCon:手势跟踪的置信度阈值,默认为0.5。
-
findHands(self, img, draw=True):检测手势并在图像上绘制关键点和连接线。img:输入图像(numpy数组)。draw:是否在图像上绘制标记,默认为True。
-
mpHands:Mediapipe Hands 模块。 -
hands:Hand 模型,用于手势检测。 -
mpDraw:Mediapipe 绘制工具。 -
tipIds:手指末端关键点的ID列表。
-
-
findHands方法:接收输入图像,检测手势,并在图像上绘制关键点和连接线。img:输入图像(numpy数组)。draw:是否在图像上绘制标记,默认为True。
-
imgRGB = cv2.cvtColor(img, cv2.COLOR_BGR2RGB):将BGR格式的图像转换为RGB格式,以便Mediapipe处理。 -
self.results = self.hands.process(imgRGB):使用Mediapipe Hand模型处理图像,得到手势检测结果。 -
if self.results.multi_hand_landmarks::如果检测到多只手。 -
for handLms in self.results.multi_hand_landmarks::遍历每只检测到的手。 -
self.mpDraw.draw_landmarks(img, handLms, self.mpHands.HAND_CONNECTIONS):在图像上绘制手势关键点和连接线。 -
返回绘制了关键点和连接线的图像。
def findPosition(self, img, handNo=0, draw=True):"""获取手指关键点位置和包围框。Args:img (numpy.ndarray): 输入图像。handNo (int): 指定要分析的手的索引。默认为0,即第一只手。draw (bool): 是否在图像上绘制标记。默认为True。Returns:list: 手指关键点列表。tuple: 包围框坐标 (xmin, ymin, xmax, ymax)。"""xList = []yList = []bbox = []self.lmList = []if self.results.multi_hand_landmarks:myHand = self.results.multi_hand_landmarks[handNo]for id, lm in enumerate(myHand.landmark):# 获取关键点在图像中的坐标h, w, c = img.shapecx, cy = int(lm.x * w), int(lm.y * h)xList.append(cx)yList.append(cy)self.lmList.append([id, cx, cy])if draw:# 在图像上绘制关键点cv2.circle(img, (cx, cy), 5, (255, 0, 255), cv2.FILLED)xmin, xmax = min(xList), max(xList)ymin, ymax = min(yList), max(yList)bbox = xmin, ymin, xmax, ymaxif draw:# 在图像上绘制包围框cv2.rectangle(img, (xmin - 20, ymin - 20), (xmax + 20, ymax + 20),(0, 255, 0), 2)return self.lmList, bbox
这是第二个小模块,用于获取手指关键点位置和包围框。下面是对第二个小模块的详细解释:
-
findPosition方法:在图像上绘制手指关键点,并返回手指关键点的坐标列表以及手的包围框坐标。img:输入图像(numpy数组)。handNo:指定要分析的手的索引,默认为0,即第一只手。draw:是否在图像上绘制标记,默认为True。
-
xList和yList:用于存储手指关键点的 x 和 y 坐标。 -
bbox:包围框的坐标,用于确定手的位置。 -
self.lmList:手指关键点的列表,格式为 [id, x, y]。 -
myHand = self.results.multi_hand_landmarks[handNo]:获取指定索引的手势关键点信息。 -
for id, lm in enumerate(myHand.landmark)::遍历手的关键点。 -
h, w, c = img.shape:获取图像的高度、宽度和通道数。 -
cx, cy = int(lm.x * w), int(lm.y * h):计算关键点在图像中的坐标。 -
xList.append(cx)和yList.append(cy):将坐标添加到列表中。 -
self.lmList.append([id, cx, cy]):将关键点信息添加到关键点列表中。 -
if draw::如果绘制标记为True。 -
cv2.circle(img, (cx, cy), 5, (255, 0, 255), cv2.FILLED):在图像上绘制关键点。 -
xmin, xmax = min(xList), max(xList)和ymin, ymax = min(yList), max(yList):计算包围框的坐标。 -
bbox = xmin, ymin, xmax, ymax:设置包围框的坐标。 -
cv2.rectangle(img, (xmin - 20, ymin - 20), (xmax + 20, ymax + 20), (0, 255, 0), 2):在图像上绘制包围框。 -
返回手指关键点列表和包围框坐标。
def fingersUp(self):"""判断手指是否伸展。Returns:list: 包含每个手指的状态,1表示伸展,0表示弯曲。"""fingers = []# 判断拇指是否伸展if self.lmList[self.tipIds[0]][1] > self.lmList[self.tipIds[0] - 1][1]:fingers.append(1)else:fingers.append(0)# 判断其他手指是否伸展for id in range(1, 5):if self.lmList[self.tipIds[id]][2] < self.lmList[self.tipIds[id] - 2][2]:fingers.append(1)else:fingers.append(0)return fingersdef findDistance(self, p1, p2, img, draw=True, r=15, t=3):"""计算两个关键点之间的距离。Args:p1 (int): 第一个关键点的索引。p2 (int): 第二个关键点的索引。img (numpy.ndarray): 输入图像。draw (bool): 是否在图像上绘制标记。默认为True。r (int): 圆的半径,用于标记关键点。默认为15。t (int): 绘制线条的粗细。默认为3。Returns:float: 两个关键点之间的距离。numpy.ndarray: 绘制了距离标记的图像。list: 包含关键点坐标的列表 [x1, y1, x2, y2, cx, cy]。"""x1, y1 = self.lmList[p1][1:]x2, y2 = self.lmList[p2][1:]cx, cy = (x1 + x2) // 2, (y1 + y2) // 2if draw:# 在图像上绘制线条和关键点cv2.line(img, (x1, y1), (x2, y2), (255, 0, 255), t)cv2.circle(img, (x1, y1), r, (255, 0, 255), cv2.FILLED)cv2.circle(img, (x2, y2), r, (255, 0, 255), cv2.FILLED)cv2.circle(img, (cx, cy), r, (0, 0, 255), cv2.FILLED)# 计算两个关键点之间的距离length = math.hypot(x2 - x1, y2 - y1)return length, img, [x1, y1, x2, y2, cx, cy]
这是第三个小模块,用于判断手指是否伸展以及计算两个关键点之间的距离。下面是对第三个小模块的详细解释:
-
fingersUp方法:判断每个手指是否伸展,返回包含手指状态的列表。- 返回值:包含每个手指状态的列表,1表示伸展,0表示弯曲。
-
findDistance方法:计算两个关键点之间的距离,并在图像上绘制标记。p1和p2:两个关键点的索引。img:输入图像(numpy数组)。draw:是否在图像上绘制标记,默认为True。r:圆的半径,用于标记关键点,默认为15。t:绘制线条的粗细,默认为3。
-
x1, y1 = self.lmList[p1][1:]和x2, y2 = self.lmList[p2][1:]:获取两个关键点的坐标。 -
cx, cy = (x1 + x2) // 2, (y1 + y2) // 2:计算两个关键点的中心坐标。 -
if draw::如果绘制标记为True。 -
cv2.line(img, (x1, y1), (x2, y2), (255, 0, 255), t):在图像上绘制连接两个关键点的线条。 -
cv2.circle(img, (x1, y1), r, (255, 0, 255), cv2.FILLED)和cv2.circle(img, (x2, y2), r, (255, 0, 255), cv2.FILLED):在两个关键点处绘制实心圆圈,用于标记关键点。 -
cv2.circle(img, (cx, cy), r, (0, 0, 255), cv2.FILLED):在关键点中心绘制实心圆圈,用于标记距离的中心。 -
length = math.hypot(x2 - x1, y2 - y1):使用勾股定理计算两个关键点之间的距离。 -
返回值:返回计算的距离、绘制了标记的图像和包含关键点坐标的列表 [x1, y1, x2, y2, cx, cy]。
完整代码
"""
Hand Tracking Module"""import cv2
import mediapipe as mp
import time
import math
import numpy as npclass handDetector():def __init__(self, mode=False, maxHands=2, detectionCon=0.5, trackCon=0.5):self.mode = modeself.maxHands = maxHandsself.detectionCon = detectionConself.trackCon = trackConself.mpHands = mp.solutions.handsself.hands = self.mpHands.Hands(self.mode, self.maxHands,self.detectionCon, self.trackCon)self.mpDraw = mp.solutions.drawing_utilsself.tipIds = [4, 8, 12, 16, 20]def findHands(self, img, draw=True):imgRGB = cv2.cvtColor(img, cv2.COLOR_BGR2RGB)self.results = self.hands.process(imgRGB)# print(results.multi_hand_landmarks)if self.results.multi_hand_landmarks:for handLms in self.results.multi_hand_landmarks:if draw:self.mpDraw.draw_landmarks(img, handLms,self.mpHands.HAND_CONNECTIONS)return imgdef findPosition(self, img, handNo=0, draw=True):xList = []yList = []bbox = []self.lmList = []if self.results.multi_hand_landmarks:myHand = self.results.multi_hand_landmarks[handNo]for id, lm in enumerate(myHand.landmark):# print(id, lm)h, w, c = img.shapecx, cy = int(lm.x * w), int(lm.y * h)xList.append(cx)yList.append(cy)# print(id, cx, cy)self.lmList.append([id, cx, cy])if draw:cv2.circle(img, (cx, cy), 5, (255, 0, 255), cv2.FILLED)xmin, xmax = min(xList), max(xList)ymin, ymax = min(yList), max(yList)bbox = xmin, ymin, xmax, ymaxif draw:cv2.rectangle(img, (xmin - 20, ymin - 20), (xmax + 20, ymax + 20),(0, 255, 0), 2)return self.lmList, bboxdef fingersUp(self):fingers = []# Thumbif self.lmList[self.tipIds[0]][1] > self.lmList[self.tipIds[0] - 1][1]:fingers.append(1)else:fingers.append(0)# Fingersfor id in range(1, 5):if self.lmList[self.tipIds[id]][2] < self.lmList[self.tipIds[id] - 2][2]:fingers.append(1)else:fingers.append(0)# totalFingers = fingers.count(1)return fingersdef findDistance(self, p1, p2, img, draw=True,r=15, t=3):x1, y1 = self.lmList[p1][1:]x2, y2 = self.lmList[p2][1:]cx, cy = (x1 + x2) // 2, (y1 + y2) // 2if draw:cv2.line(img, (x1, y1), (x2, y2), (255, 0, 255), t)cv2.circle(img, (x1, y1), r, (255, 0, 255), cv2.FILLED)cv2.circle(img, (x2, y2), r, (255, 0, 255), cv2.FILLED)cv2.circle(img, (cx, cy), r, (0, 0, 255), cv2.FILLED)length = math.hypot(x2 - x1, y2 - y1)return length, img, [x1, y1, x2, y2, cx, cy]def main():pTime = 0cTime = 0cap = cv2.VideoCapture(1)detector = handDetector()while True:success, img = cap.read()img = detector.findHands(img)lmList, bbox = detector.findPosition(img)if len(lmList) != 0:print(lmList[4])cTime = time.time()fps = 1 / (cTime - pTime)pTime = cTimecv2.putText(img, str(int(fps)), (10, 70), cv2.FONT_HERSHEY_PLAIN, 3,(255, 0, 255), 3)cv2.imshow("Image", img)cv2.waitKey(1)if __name__ == "__main__":main()
二、主代码
import cv2
import numpy as np
import HandTrackingModule as htm
import time
import autopy##########################
wCam, hCam = 640, 480
frameR = 100  # Frame Reduction
smoothening = 7
#########################pTime = 0
plocX, plocY = 0, 0
clocX, clocY = 0, 0cap = cv2.VideoCapture(0)
cap.set(3, wCam)
cap.set(4, hCam)
detector = htm.handDetector(maxHands=1)
wScr, hScr = autopy.screen.size()
# print(wScr, hScr)while True:# 1. Find hand Landmarkssuccess, img = cap.read()img = detector.findHands(img)lmList, bbox = detector.findPosition(img)# 2. Get the tip of the index and middle fingersif len(lmList) != 0:x1, y1 = lmList[8][1:]x2, y2 = lmList[12][1:]# print(x1, y1, x2, y2)# 3. Check which fingers are upfingers = detector.fingersUp()# print(fingers)cv2.rectangle(img, (frameR, frameR), (wCam - frameR, hCam - frameR),(255, 0, 255), 2)# 4. Only Index Finger : Moving Modeif fingers[1] == 1 and fingers[2] == 0:# 5. Convert Coordinatesx3 = np.interp(x1, (frameR, wCam - frameR), (0, wScr))y3 = np.interp(y1, (frameR, hCam - frameR), (0, hScr))# 6. Smoothen ValuesclocX = plocX + (x3 - plocX) / smootheningclocY = plocY + (y3 - plocY) / smoothening# 7. Move Mouseautopy.mouse.move(wScr - clocX, clocY)cv2.circle(img, (x1, y1), 15, (255, 0, 255), cv2.FILLED)plocX, plocY = clocX, clocY# 8. Both Index and middle fingers are up : Clicking Modeif fingers[1] == 1 and fingers[2] == 1:# 9. Find distance between fingerslength, img, lineInfo = detector.findDistance(8, 12, img)print(length)# 10. Click mouse if distance shortif length < 40:cv2.circle(img, (lineInfo[4], lineInfo[5]),15, (0, 255, 0), cv2.FILLED)autopy.mouse.click()# 11. Frame RatecTime = time.time()fps = 1 / (cTime - pTime)pTime = cTimecv2.putText(img, str(int(fps)), (20, 50), cv2.FONT_HERSHEY_PLAIN, 3,(255, 0, 0), 3)# 12. Displaycv2.imshow("Image", img)cv2.waitKey(1)
下面是代码的主要功能和操作步骤的解释:
-
导入所需的库和模块(
cv2、numpy、HandTrackingModule、time、autopy)以及一些配置参数。 -
创建摄像头对象
cap,设置摄像头的宽度和高度为wCam和hCam。 -
创建一个
handDetector对象detector,用于检测手势。在这里,我们只使用一个手,所以设置maxHands=1。 -
获取屏幕的宽度和高度,以便后面的坐标转换。
-
进入一个无限循环,不断处理视频帧。
-
在循环中,首先从摄像头获取一帧图像,并调用
detector.findHands方法来检测手势。然后,调用detector.findPosition方法获取手势的关键点坐标和边界框。 -
根据检测到的手势关键点,判断手指的状态(是否抬起)。
-
绘制一个矩形框作为活动区域,用于移动鼠标。
-
当食指抬起而中指不抬起时,进入移动模式。将手势坐标转换为屏幕上的坐标,然后进行平滑处理,最后使用
autopy.mouse.move方法移动鼠标。 -
绘制一个实心圆表示食指的位置,并更新上一次的位置。
-
当食指和中指同时抬起时,进入点击模式。计算食指和中指之间的距离,如果距离小于阈值,执行鼠标点击操作。
-
计算并显示帧率。
-
将处理后的图像显示在窗口中,按下任意键退出循环。
利用摄像头捕获的图像,检测手势,然后根据手指状态来模拟鼠标操作。移动模式下,用食指位置移动鼠标;点击模式下,用食指和中指之间的距离来模拟鼠标点击。这样可以实现通过手势来控制鼠标的功能。
需要注意的是,运行代码前,需要将食指放在摄像头前。否则会报错
遇到其他错误,可以评论区留言,大家一起解决


)


@EnableWebMvc注解为什么让@WebMvcAutoconfiguration失效?)


)


