
介绍
开发多语言支持的ASP.NET Core 2.x Web应用程序需要大量的基础架构设置,并且耗费时间和精力。这篇文章,我们将使用LazZiya.ExpressLocalization nuget包一步本地化支持。
背景
大多数网络应用程序都是基于网址的本地化。因此我们可以在网址中看到所选的语言。例如http://www.example.com/en/Contact。不幸的是,ASP.NET Core 仅提供一下请求语言程序。
QueryStringRequestCultureProvider
CookieRequestCultureProvider
AcceptLanguageHeaderRequestCultureProvider
为了实现路由值本地化,我们需要构建自定义本地化程序并定义全局路由模版。基本上,我们需要完成一下本地化步骤才能拥有完全本地化的Web应用程序。
Build route value request culture provider
Define global route template for culture parameter
Setup DataAnnotations localization
Setup ModelBinding error messages localization
Setup identity describer error messsages
Setup view localization
Setup client side validation scripts for validating localized number, dates, etc.
Provide localized resources for each part 所有这些步骤都需要耗费大量工作和时间。因此,使用LazZiya.ExpressLocalization包的好处就是通过简单的代码消除在本地化设置方面耗费的时间和精力。
创建工程
让我们创建一个基于ASP.NET Core 2.2 的Web应用程序(我使用的是VS 2019)
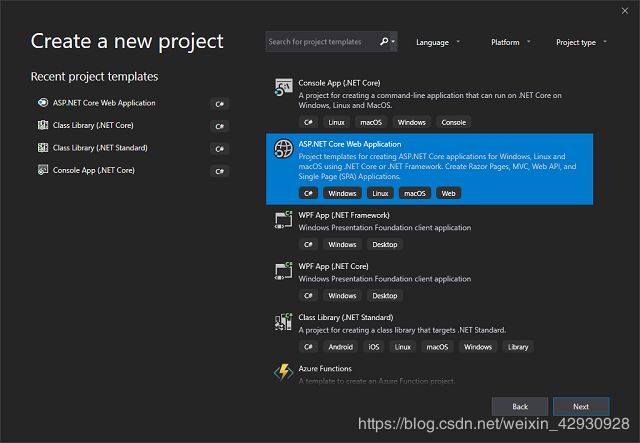
创建一个新工程,选择ASP.NET Core Web Application.
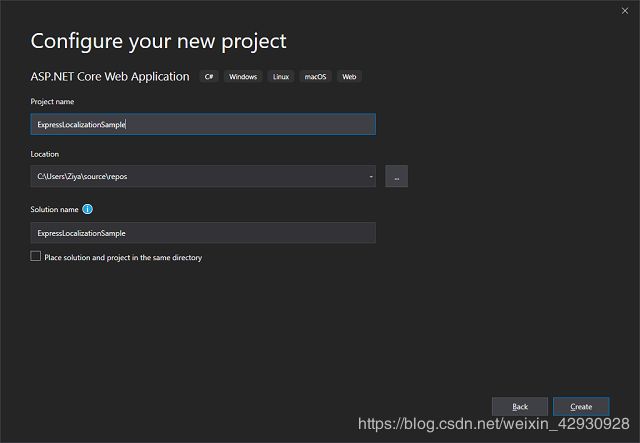
点击下一步,给工程一个友好的名称,点击创建
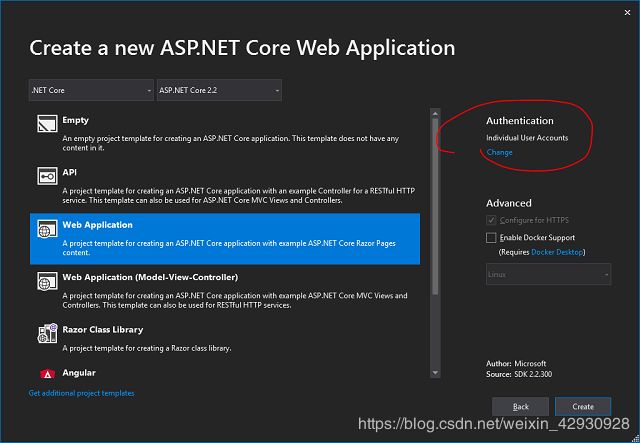
选择Web应用程序,并确保将身份验证更改为个人用户账户
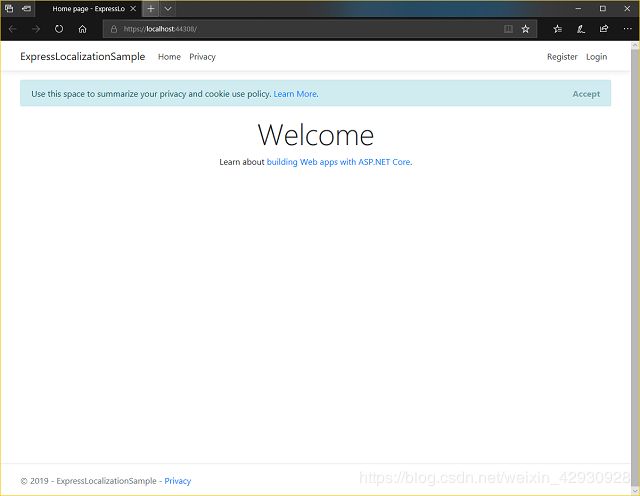
点击创建,等待解决方案创建完成。完成后,可以通过解决方案资源管理器中选择项目名称来执行测试运行,然后按(CTRL+B)构建项目,按(CTRL+W)在浏览器中运行,而不是调试。
安装 LazZiya.ExpressLocalization
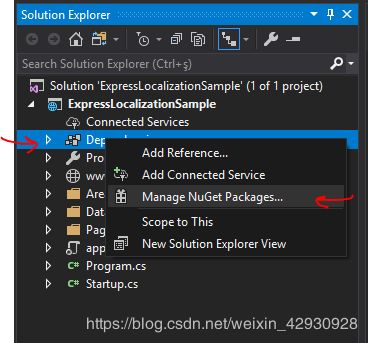
在项目名称下的解决方案资源管理器中,右键单击Dependencies并选择Manage
Nuget Packages
转到Browse选项卡,并搜索LazZiya,选择LazZiya.ExpressLocalization,点击Install,选择最新版本(写这篇文章是最新版本为v1.1.1)
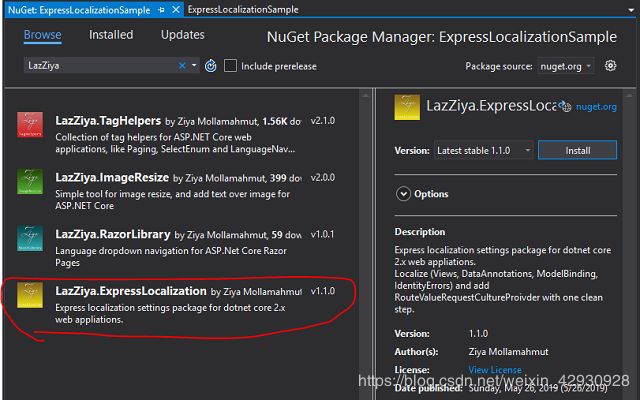
它将要求安装两个软件包,点击OK,等待安装完成
LazZiya.ExpressLocalization (required for all localization setup)
LazZiya.TagHelpers (required for client side localization validation and language dropdown)
创建本地化资源
我已经为项目准备了本地化资源,因此你不必郎芬时间来创建本地化资源。 在项目根路径创建一个新文件夹命名为“LocalizationResources”
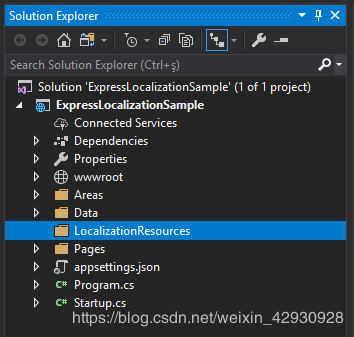
在LocalizationResources文件夹下,创建个public类, 名称为“ViewLocalizationResource”,这个类将用于对资源文件进行分组已进行视图本地化。
namespace ExpressLocalizationSample.LocalizationResources
{	public class ViewLocalizationResource	{	}
}
在LocalizationResources 文件夹下创建public类,名称为“ExpressLocalizationResource”,此类用于对identity,模型绑定(model binding)和数据注解(data annotation)的分组资源文件。
namespace ExpressLocalizationSample.LocalizationResources{public class ExpressLocalizationResource{}}
我们将使用这两个类将资源类型传递个快速本地化方法。
最后,从此存储库文件夹下载先关的语言资源文件。请注意,你需要为每种语言下载两个文件,例如ExpressLocalizationResource.tr.resx 和ViewLocalizationResource.tr.resx。复制下载的文件到LocalizationResources文件夹
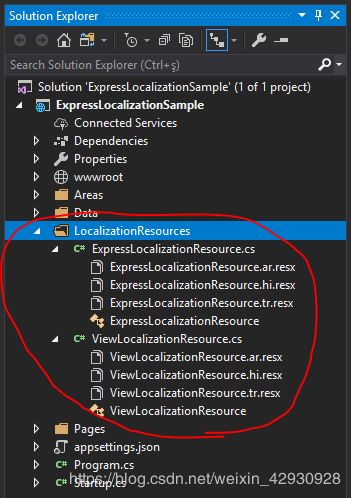
在代码中使用
最后,我们已经准备好进行本地化设置了。 打开startup.cs文件并添加所需的语言列表,然后添加一步本地化设置,
var cultures = new[]{new CultureInfo("tr"),new CultureInfo("ar"),new CultureInfo("hi"),new CultureInfo("en"),};services.AddMvc().AddExpressLocalization<ExpressLocalizationResource, ViewLocalizationResource>(ops =>{ops.ResourcesPath = "LocalizationResources";ops.RequestLocalizationOptions = o =>{o.SupportedCultures = cultures;o.SupportedUICultures = cultures;o.DefaultRequestCulture = new RequestCulture("en");};}).SetCompatibilityVersion(CompatibilityVersion.Version_2_2);
然后在Configure方法下,配置应用程序以使用请求本地化
app.UseRequestLocalization();
添加语言导航
在Pages文件夹下,打开_ViewImports.cshtml文件,并添加LazZiya.TagHelpers,这个有助于创建语言导航。
@using LazZiya.TagHelpers@addTagHelper *, LazZiya.TagHelpers
打开Pages/Shared/Layout.cshtml文件,并在LoginPartial 标签添加语言导航标签。
<partial name="_LoginPartial" /><language-nav view-context="ViewContext"></language-nav>
LanguageNav有一个必须的参数“view-context”。可以查阅有关LanguageNav tag helper资源。
我们进行第一次运行:
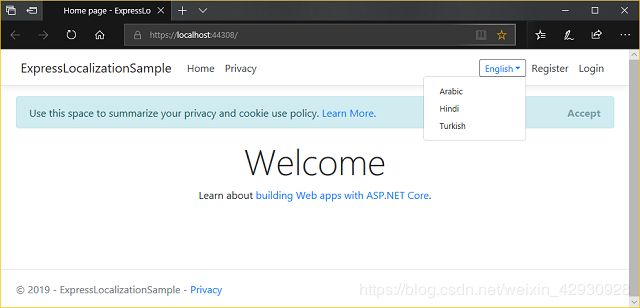
运行的很好,到目前为止我们的导航支持多语言,但我们仍然需要本地化视图已查看本地化版本。
本地化视图
已下载的“ViewLocalizationResource.xx.resx”文件中已提供默认项目的本地化文本,如果需要为视图添加更多自定义文本,需要将它们添加到“ViewLocalizationResource.xx.resx”文件中。 打开Pages/_ViewImport.cshtml文件并注入SharedCultureLocalizer,需要引用ExpressLocalization。
@using LazZiya.ExpressLocalization@inject SharedCultureLocalizer _loc
然后打开Pages/Index.cshtml并使用文本本地化方法。
@page@model IndexModel@{ViewData["Title"] = _loc.Text("Home page");}<div class="text-center"><h1 class="display-4">@_loc.Text("Welcome")</h1><p>@_loc.Text("Learn about<a href='https://docs.microsoft.com/aspnet/core'>building Web apps with ASP.NET Core</a>").</p></div>
使用相同的过程来本地化其他视图中的所有文本。
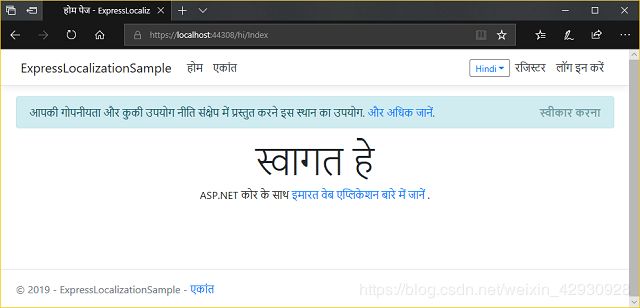
本地化URLs
虽然页面处理默认的语言中,但是如果点击Privacy,Login,Reigster链接,将会注意到我们丢失了所选的语言,这是因为我们未将语言路由值添加到链接中。
打开Pages/Index.cshtml文件,添加System.Globalization的引用 @usingSystem.Globalization
然后打开Pages/_LoginPartial.cshtml文件,在页面顶部添加一个culture参数
@{var culture = CultureInfo.CurrentCulture.Name;}
使用此参数为所有链接提供语言路由值,
<a class="nav-link text-dark" asp-area="Identity" asp-page="/Account/Register"asp-route-culture="@culture">@_loc.Text("Register")</a>
对项目中所有的视图执行此操作。
本地化身份验证视图
诸如登录、注册、和配置文件等相关Identity进行搭建后才能进行修改。 右键点击项目名称,选择Add --> New Scaffolded Item...
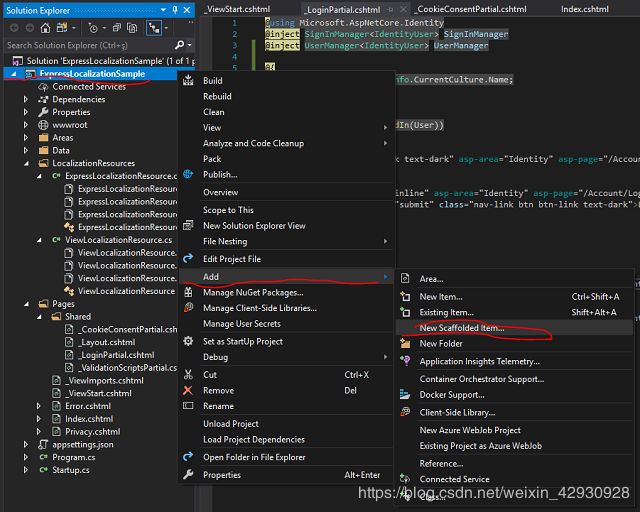
选择Identity,并点击Add
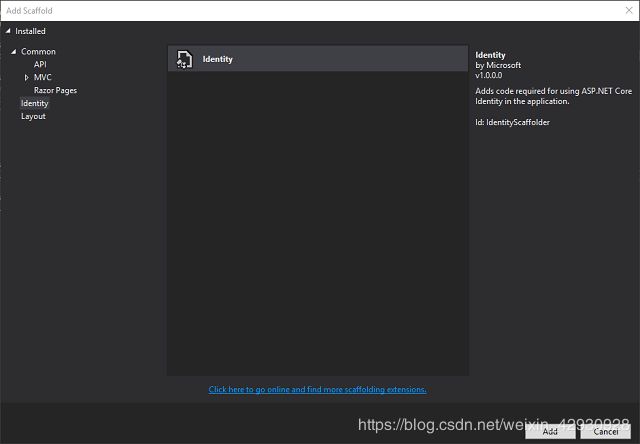
选择Override all files,并选择ApplicationDbContext
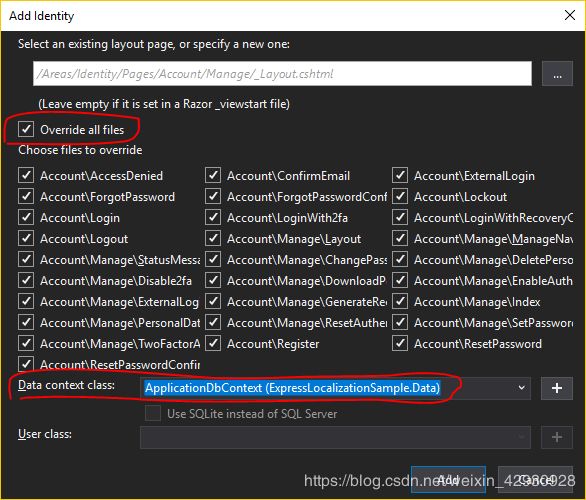
点击Add后,将创建一个新的域文件夹,包括所有与Identity相关的视图
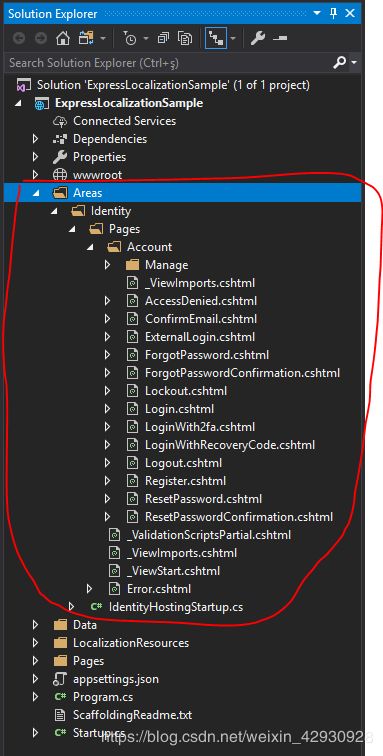
Identity域包括三个_ViewImports文件夹:
Areas/Identity/Pages/_ViewImports.cshtml
Areas/Identity/Pages/Account/_ViewImports.cshtml
Areas/Identity/Pages/Account/Manage/ViewImports.cshtml 像以前对Pages/ViewImports.cshtml所做的那样,将以下代码添加到所有的这些文件中
@using System.Globalization@using LazZiya.TagHelpers@addTagHelper *, LazZiya.TagHelpers@using LazZiya.ExpressLocalization@inject SharedCultureLocalizer _loc
像以前一样,浏览修改里面的视图文件并添加上语言路径参数,以下是对Register.cshtml页面的修改
@page@model RegisterModel@{ViewData["Title"] = _loc.Text("Register");var culture = CultureInfo.CurrentCulture.Name;}<h1>@ViewData["Title"]</h1><div class="row"><div class="col-md-4"><form asp-route-returnUrl="@Model.ReturnUrl"method="post" asp-route-culture="@culture"><h4>@_loc.Text("Create a new account").</h4><hr /><div asp-validation-summary="All" class="text-danger"></div><div class="form-group"><label asp-for="Input.Email"></label><input asp-for="Input.Email" class="form-control" /><span asp-validation-for="Input.Email"class="text-danger"></span></div><div class="form-group"><label asp-for="Input.Password"></label><input asp-for="Input.Password" class="form-control" /><span asp-validation-for="Input.Password"class="text-danger"></span></div><div class="form-group"><label asp-for="Input.ConfirmPassword"></label><input asp-for="Input.ConfirmPassword" class="form-control" /><span asp-validation-for="Input.ConfirmPassword"class="text-danger"></span></div><button type="submit"class="btn btn-primary">@_loc.Text("Register")</button></form></div></div>@section Scripts {<partial name="_ValidationScriptsPartial" />}
本地化DataAnnotations
如果你运行页面并执行一些无效的输入,你会发现验证消息是英文的,因此我们需要本地化数据注释消息,如Required、StringLength等。
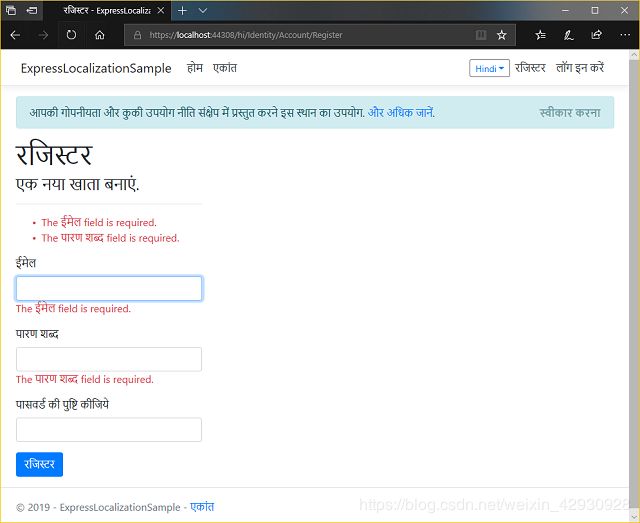
打开Areas/Identity/Pages/Account/Register.cshtml.cs文件并在顶部添加LazZiya.ExpressLocalization.Messages的引用,它包含所有DataAnnotations错误消息的预定义结构,以便于使用: @usingLazZiya.ExpressLocalization.Messages;
然后修改输入模型如下所示:
public class InputModel{[Required(ErrorMessage = DataAnnotationsErrorMessages.RequiredAttribute_ValidationError)][EmailAddress(ErrorMessage = DataAnnotationsErrorMessages.EmailAddressAttribute_Invalid)][Display(Name = "Email")]public string Email { get; set; }[Required(ErrorMessage = DataAnnotationsErrorMessages.RequiredAttribute_ValidationError)][StringLength(100, ErrorMessage =DataAnnotationsErrorMessages.StringLengthAttribute_ValidationErrorIncludingMinimum,MinimumLength = 6)][DataType(DataType.Password)][Display(Name = "Password")]public string Password { get; set; }[DataType(DataType.Password)][Display(Name = "Confirm password")][Compare("Password",ErrorMessage = DataAnnotationsErrorMessages.CompareAttribute_MustMatch)]public string ConfirmPassword { get; set; }}
编译并允许项目,将看到本地化数据注释的错误消息
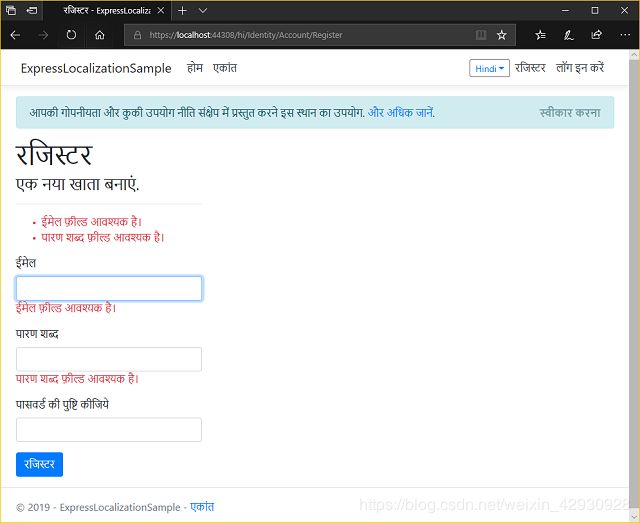
客户端验证
服务器端验证工作正常,但是我们仍然需要添加客户端验证,因此在提交表单之前,将在客户端验证输入字段。 客户端验证的一个主要问题就是验证数字、日期等本地化输入。例如,如果你使用小数输入,你讲看到1.3的本地化数字验证在英文中有效,但是对土耳其语无效,因为它应为1,3(逗号而不是句点) 在这里,我们将使用LazZiya.TagHelpers附带的另一个有用的tag helper。 打开Register.cshtml页面并在默认验证脚本partial下添加 tag helper。
@section Scripts {<partial name="_ValidationScriptsPartial" /><localization-validation-scripts></localization-validation-scripts>}
这就是全部,现在将在使用本地化验证消息提交表单之前验证字段。
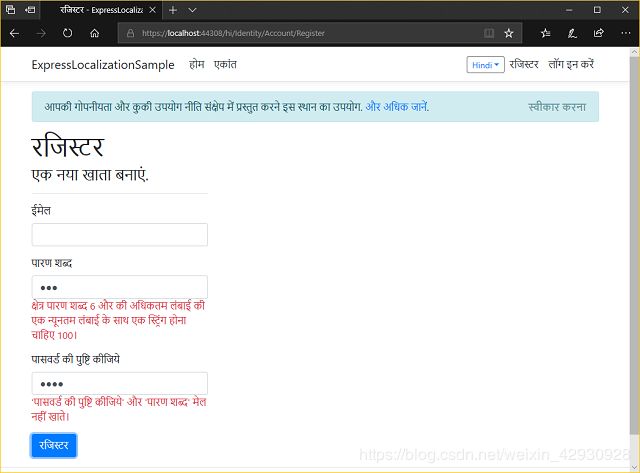
示例项目
你可以从Github下载包含超过19种语言包的示例项目
https://github.com/LazZiya/ExpressLocalizationSample
参考
在这里阅读有关使用nuget包的更多详细信息:
LazZiya.TagHelpers
Manually installing client side localization validation scripts
Manually creating language drop down navigation
Even more can be found on my website http://ziyad.info
原文地址
https://www.codeproject.com/Articles/5061604/Developing-Multicultural-ASP-NET-Core-2-x-Project
注:原创声明为翻译原创
.NET社区新闻,深度好文,欢迎访问公众号文章汇总 http://www.csharpkit.com 


![[ARC072C]Alice in linear land(dp,贪心)](http://pic.xiahunao.cn/[ARC072C]Alice in linear land(dp,贪心))
